Complete – updated 7/3/17
In my dim and distant past I spent a number of years in manufacturing high end sports cars and I remember that there was only cursory notice taken when considering how easy it was going to be to maintain aspects of the car in the future.
The object was to get the car out of the door and start on the next one.
Not so different with production built yachts as we in the yard discover almost on a daily basis.
Some of the design and build decisions hidden away under spray lacquered veneers and flashy trim really smack of the same get it out of the door quick so we can build another.
Among my current grumbles is the poor design of through deck chain plates on modern-ish grp yachts.
To be fair this has been happening since the early 80’s but it’s not got any better.
I’m not sure whether this is an issue with the designer or a problem caused by the original build but either way it means trouble in 10 to 15 years or less if you’re not careful.
When we discover a through-deck chain plate leak it’s almost always between the vertical plate and the top cover plate. Sometimes there is localised moisture through the top plate fasteners which also allows movement, and then this allows water to get under the top plate.
This then travels down the inside of the plate into the knee, eventually rotting the encapsulated wood. Moisture also soaks the deck core and wicks between the core and the upper and lower grp laminates, which ultimately leads to delamination and significant weight gain.
Many people use an adhesive sealant which on the face of it seems like a great idea but I’d urge against it. The exposed sealant degrades in UV, even the ones that are supposed to be UV resistant will still degrade, just at a slower rate.
The end result is the same, a leak.
Small at first but constant over time with the added risk of getting creeping crevice corrosion in the chain plate itself.
A good friend of mine removed a 60mmx10mm backstay chain plate in two halves recently on a 40 footer due to crevice corrosion just where the plate entered the deck.
The adhesive sealant under the top cover not affected by the UV seals well but boy it makes life hard when you want to lift the plate and inspect.
So the chances are you don’t and so won’t notice that there’s already a leak you can’t see, yet.
Instead use a non adhesive flexible sealant such as Arbokol 1000 or butyl rubber.
These never “go off” and stay flexible and in my experience retain a seal for much longer.
However the beauty is that the top plate can be lifted easily, the old sealant cleaned away and the through deck slot can be inspected on a regular basis.
Our rule is if any fitting is bolted to or through the deck then there should be no need for an adhesive sealant.
If I don’t trust the fixings 100% then I may use an adhesive sealant, such as on window frames.
(Having seen windows blow out after crashing down a backless wave I don’t trust the interscrew’s on their own)
In the case of Chain plates there should be no requirement for an adhesive sealant, all that is required is a flexible sealant.
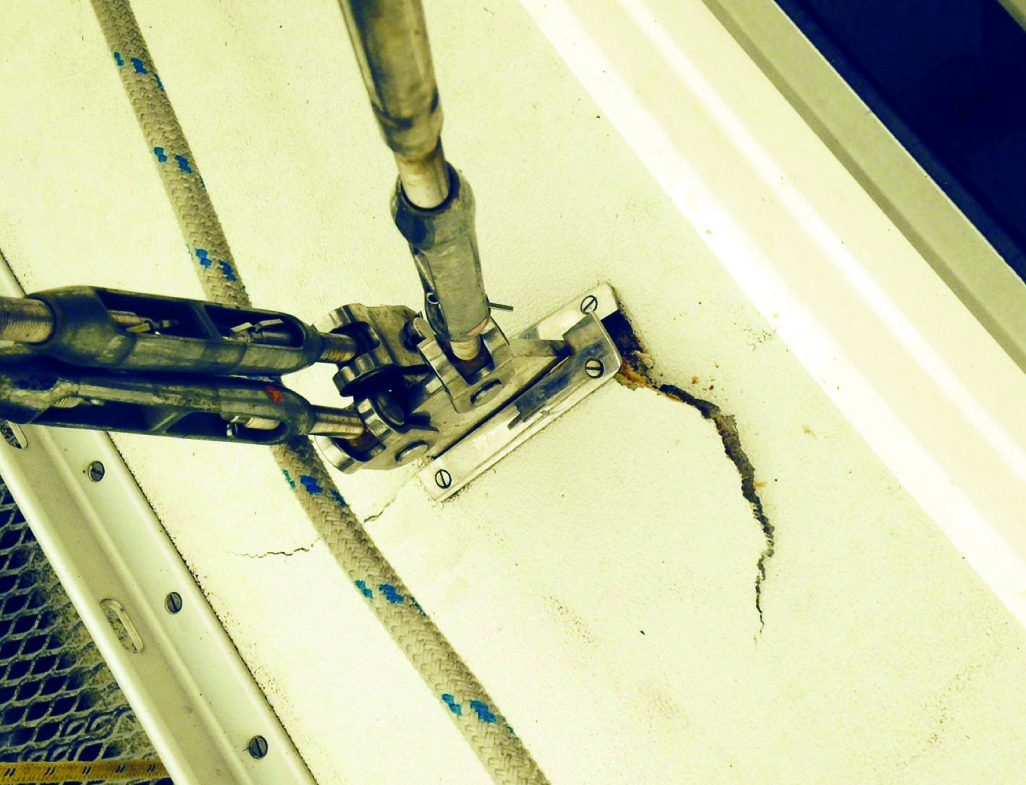
Looking at the various examples of soggy decks due to inadequate chain plate sealing the main cause is water running down the shrouds, over the bottle screw, toggle and vertically down the plate.
Next would be a small amount via the top plate fasteners and lastly under the deck plate.
Incidentally the often used shroud/bottle screw covers do not reduce the water by very much on 7/19 wire as the water follows the lay of the wire.
Also covering the bottle screw actually allows a build up of crud and green gunge which then leads to corrosion.
Our design for replacement through deck chain plates incorporates the top plate but it is seal welded to the main plate and has no visible fixing holes.
Instead it incorporates welded studs which are bolted through the deck.
There is at least 25mm from the outer edge to the nearest through deck hole.
This eliminates two of the three normal ways water gets in.
We have also incorporated a milled out groove under the top plates which will in effect provide a kind of o-ring seal.
The size of the top plates were designed to cover the deck repairs made due to the previously leaking fitting.
I decided on using an 8mm 316 plate instead of anything thinner to reduce the risk of deformation during the welding process to the 10mm main plate.
On this Moody 35, the original design is poor with the chain plate bolts way too close together which puts a lot of loading into a small area of the plywood knee.
Add water and a bit of time and its a recipe for disaster.
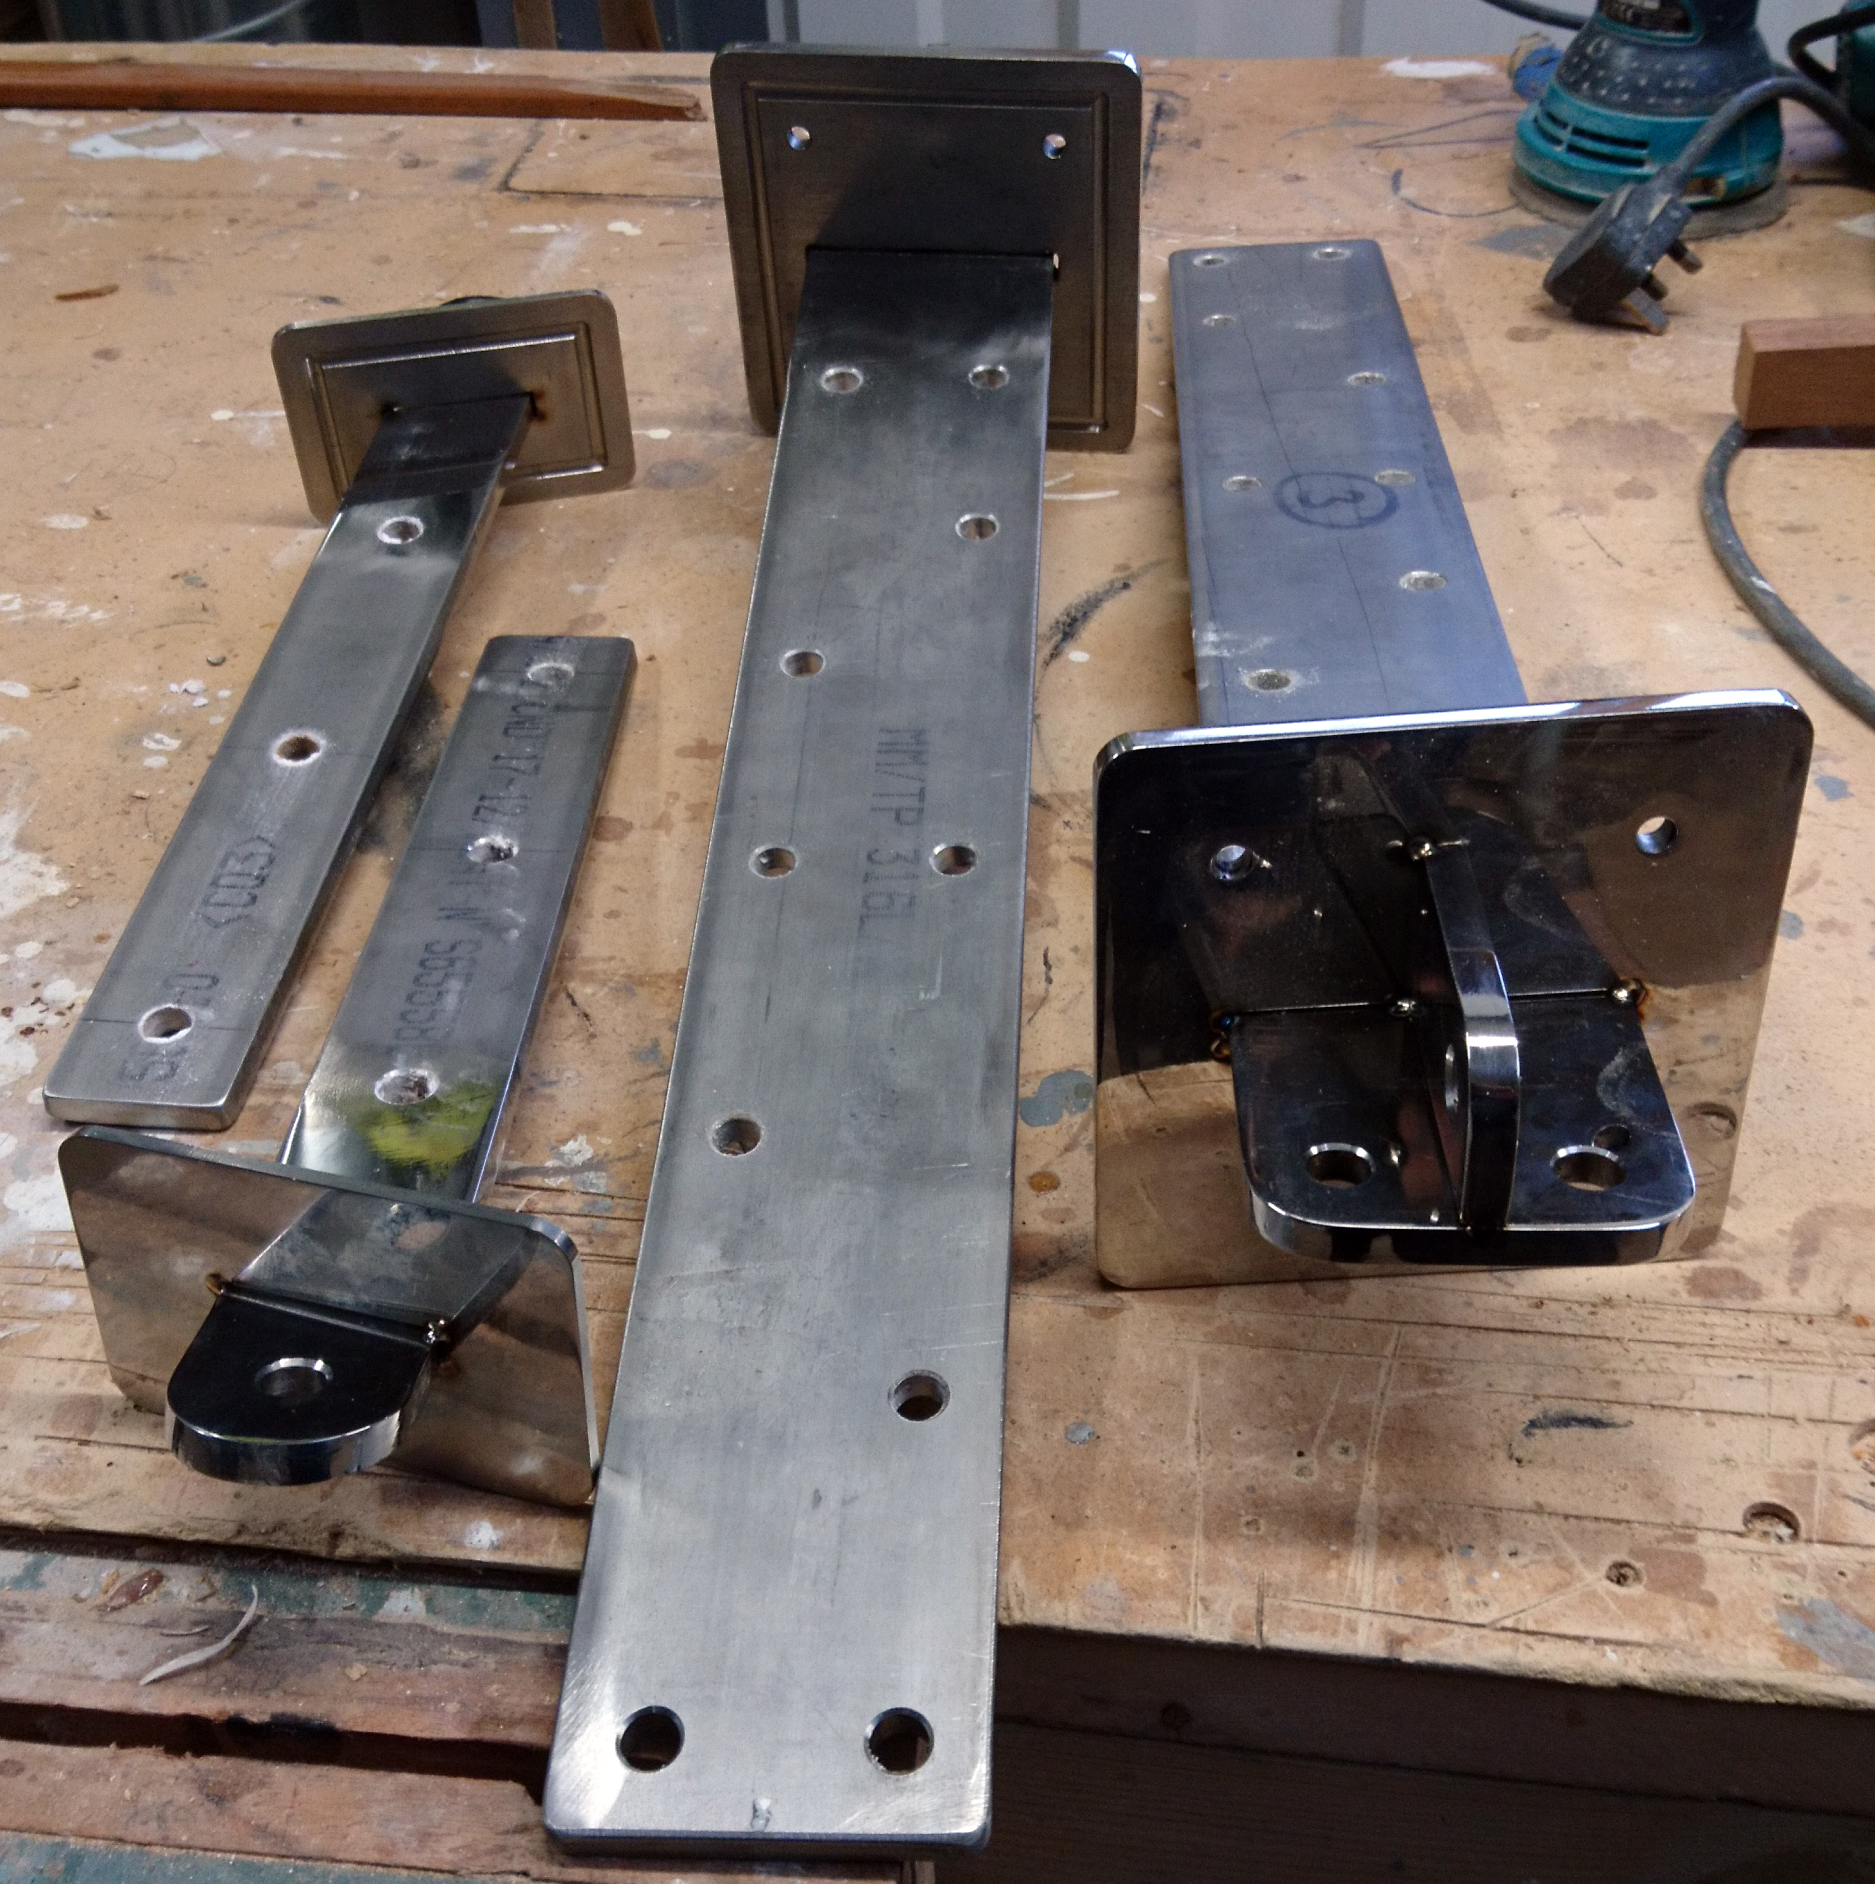
Our plate is significantly longer with well spaced mounting bolts.
Whilst we have our own welding equipment we use R&P Metalwork in Lowestoft for our critical Stainless Steel assemblies.
The manufacturing process is to firstly clamp the main plate plates into position down below, then slide the top plate into position and tack weld in place to get the precise deck angle.
Then the tacked assembly is taken away to be welded and polished before fitting using, in this case, Arbokol 1000.
Moving below I find it strange that so many designers/builders make it so hard to gain access to the chain plates especially the area where the plate passes through the deck.
It was very high on the list of modifications I made to my own boat and I encourage others to work out a way of inspecting their rig chain plates at least every year, especially if you have a fractional rig which is subjected to higher static rig loads.
With the Moody we’ve spent some time making removable panels to enable access to all the bolts and to allow future inspections.
Originally it was a seriously major task to remove the internal woodwork to gain access.
The solution on the Passport 40 is a little different but again the original fault can be traced to the builders.
The main chain plate carries the cap and the intermediate shrouds.
This obviously gave the builder an issue as the designer had drawn that the chain plate should be mounted either side of the main saloon bulkhead.
So the builder decided to build a floating knee and clamp the twin plates either side of the knee.
Trouble is the lousy deck sealing system doubled the chances of water getting into the deck and then the knee, which it did.
We decided to follow the designers original intentions and mount the chain plate to the main bulkhead once we had beefed it up.
We redesigned the chain plate to incorporate a sealed top deck plate and both tangs using 10 x 90mm plate.
With the solid top plate design it’s true that to inspect and reseal the plate it will have to be unbolted and lifted up.
However rigging up a couple of halyards, one side at a time, marking the bottle screw height before easing off, then given reasonable access to the chain plate bolts, the chain plate can easily be lifted within an hour, cleaned resealed and replaced, so long as you used a non adhesive sealant!

Typical through deck chain plate.
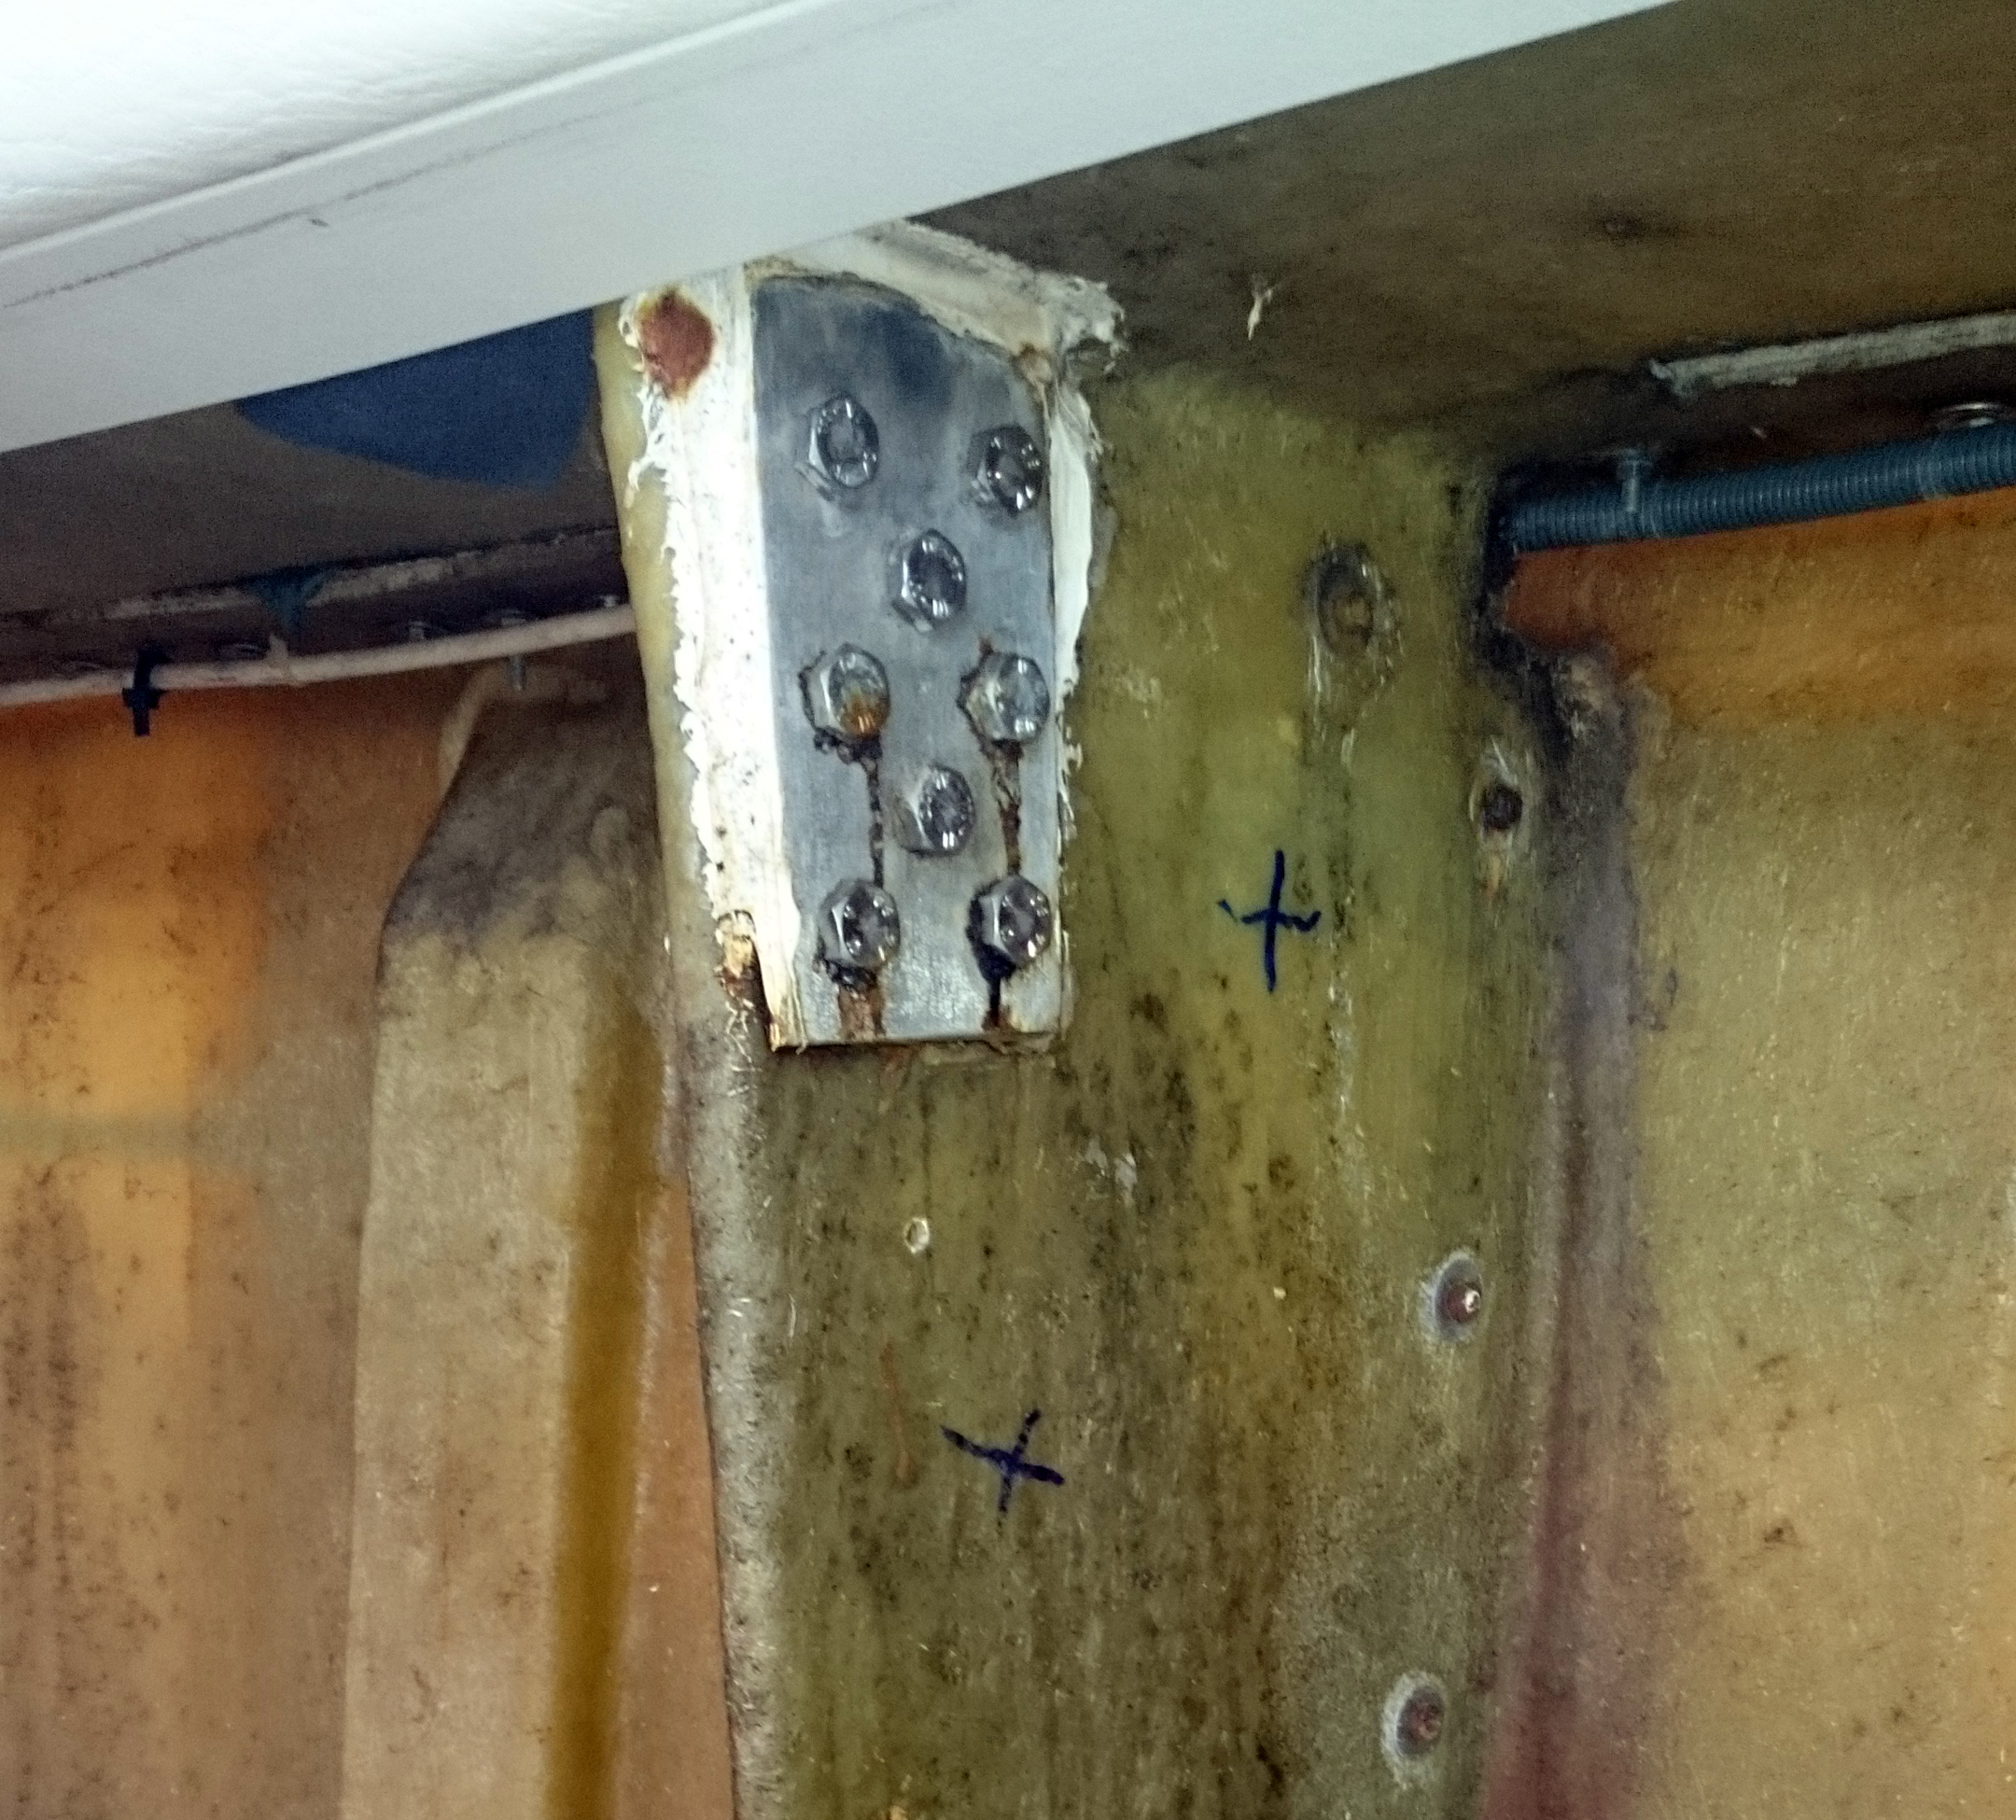
Moody 35 chain plate – the 8 x holes are too close together through the plywood knee which significantly reduces its strength.
Note the water stains from the mounting bolts.
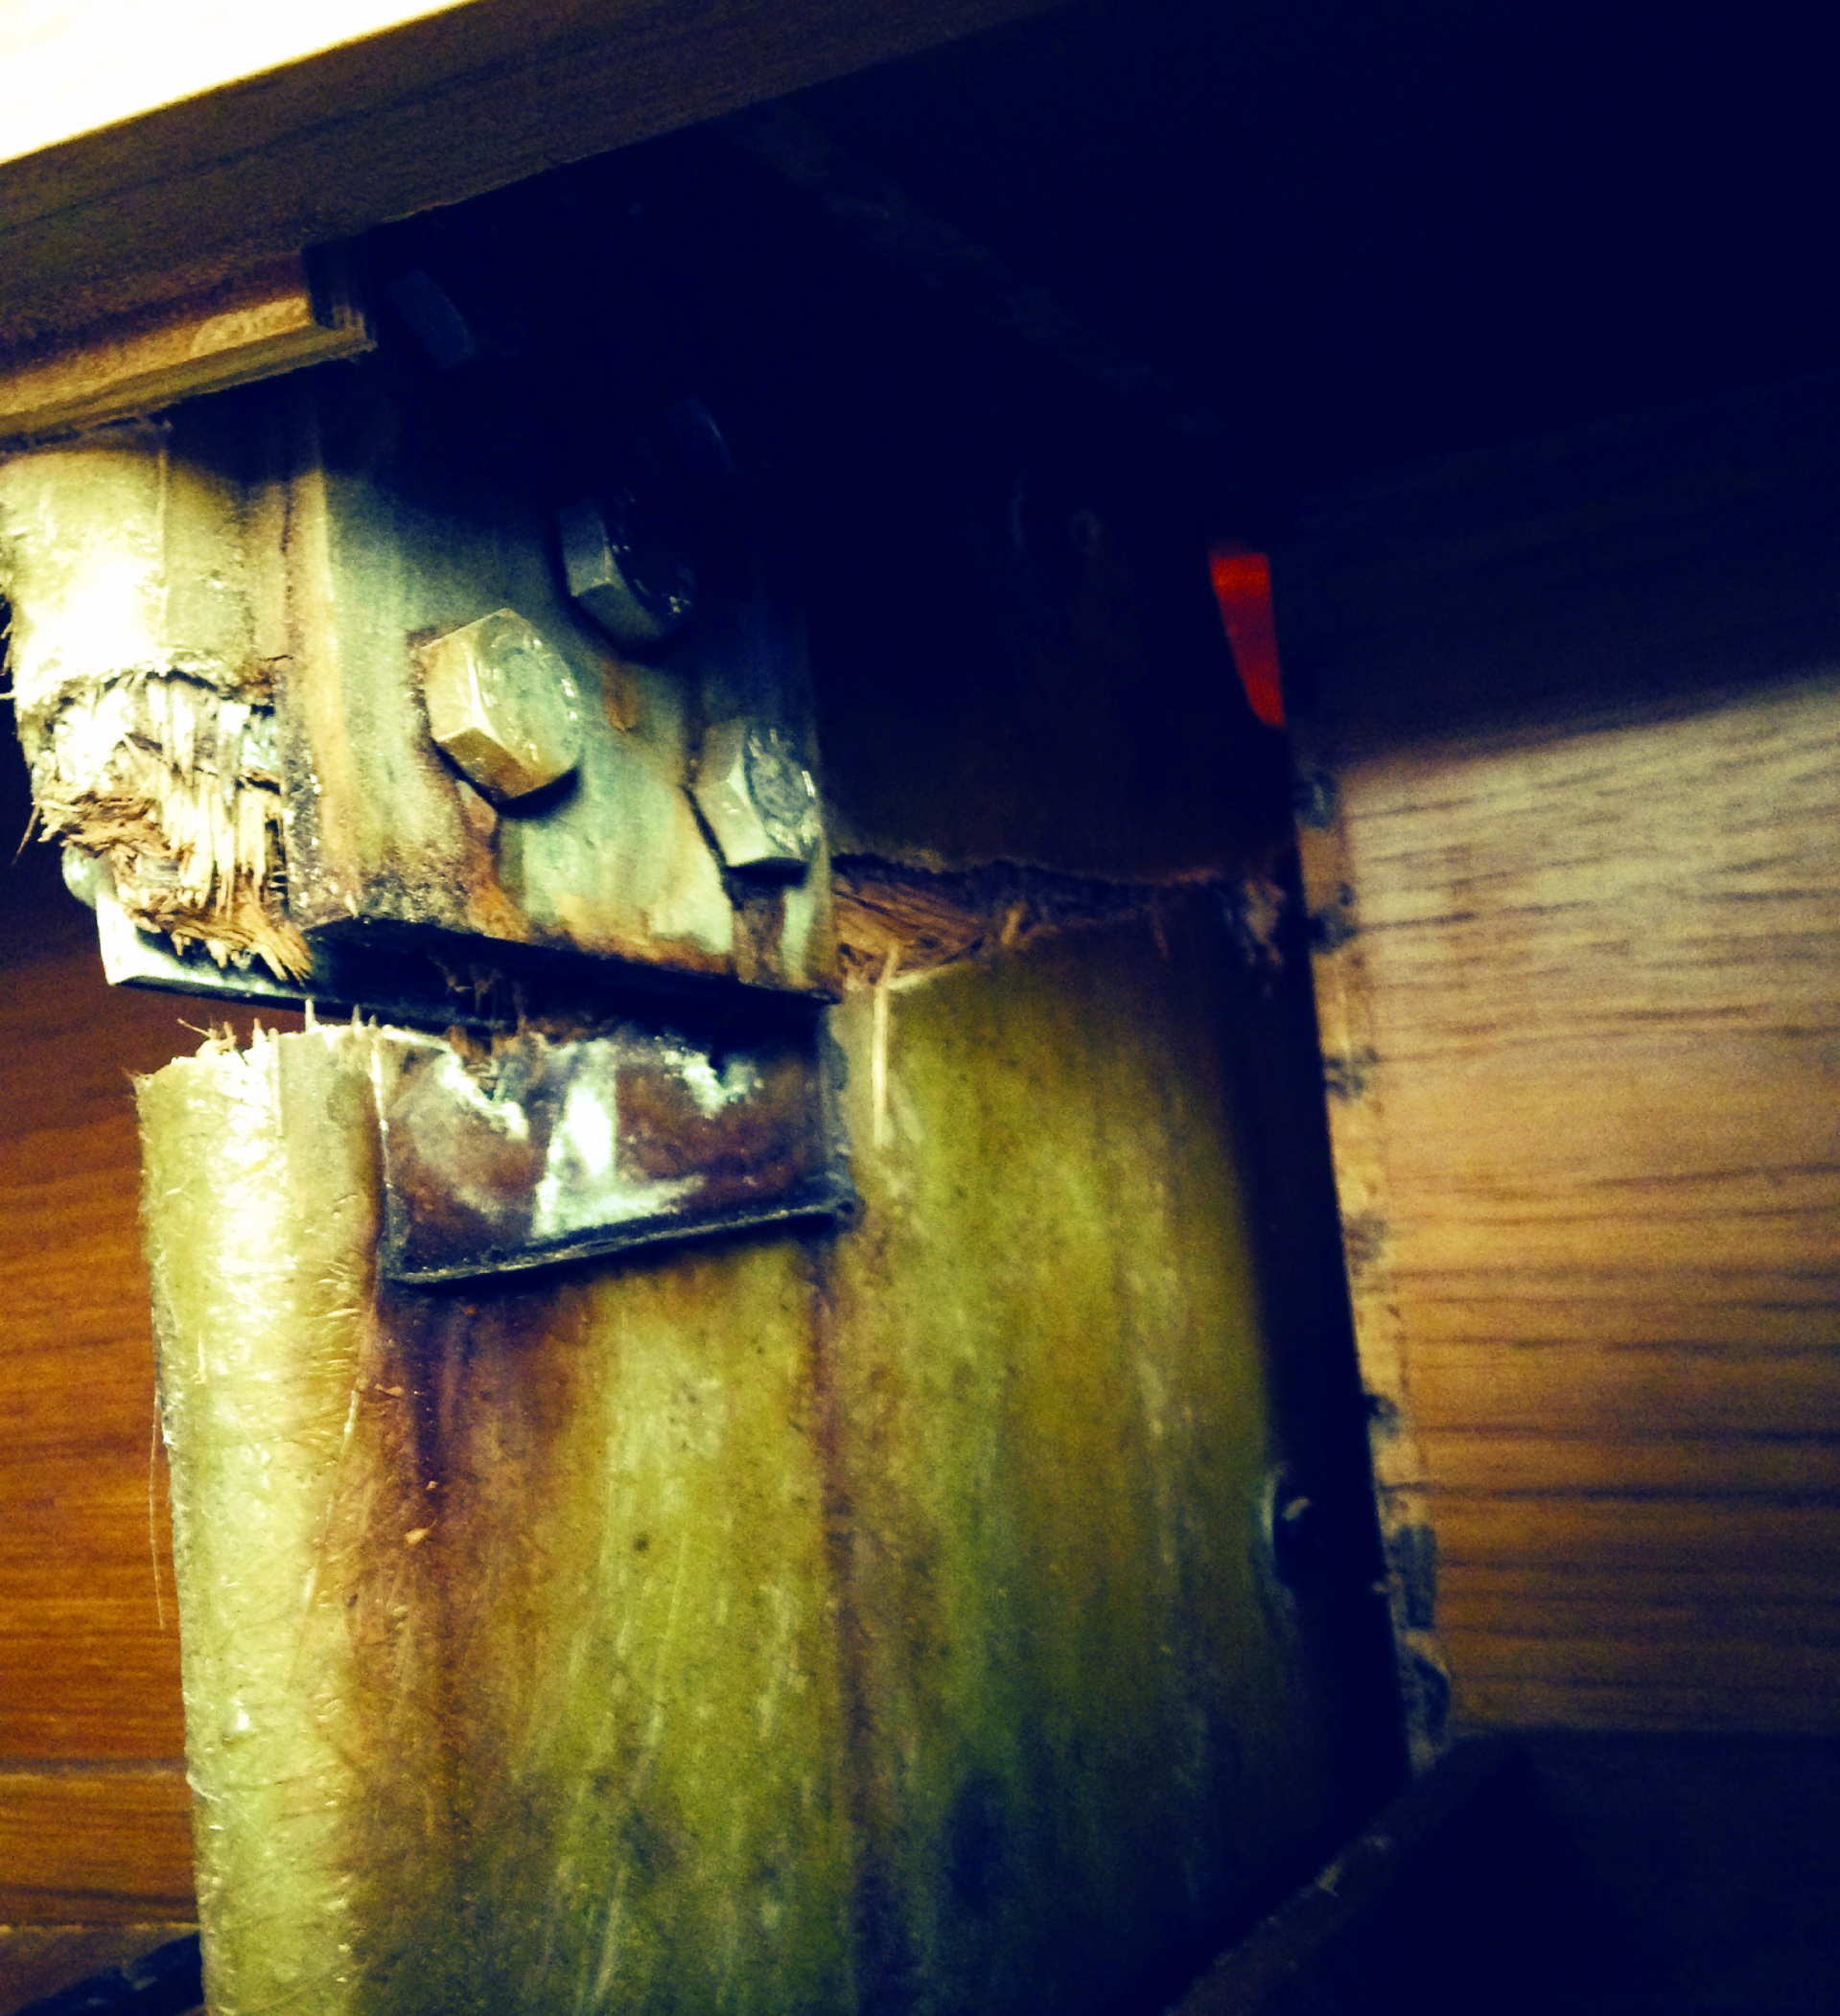
This is an example of when it all goes horribly wrong.
When the knee fails then the deck will fail and then its down to luck if you keep your mast.
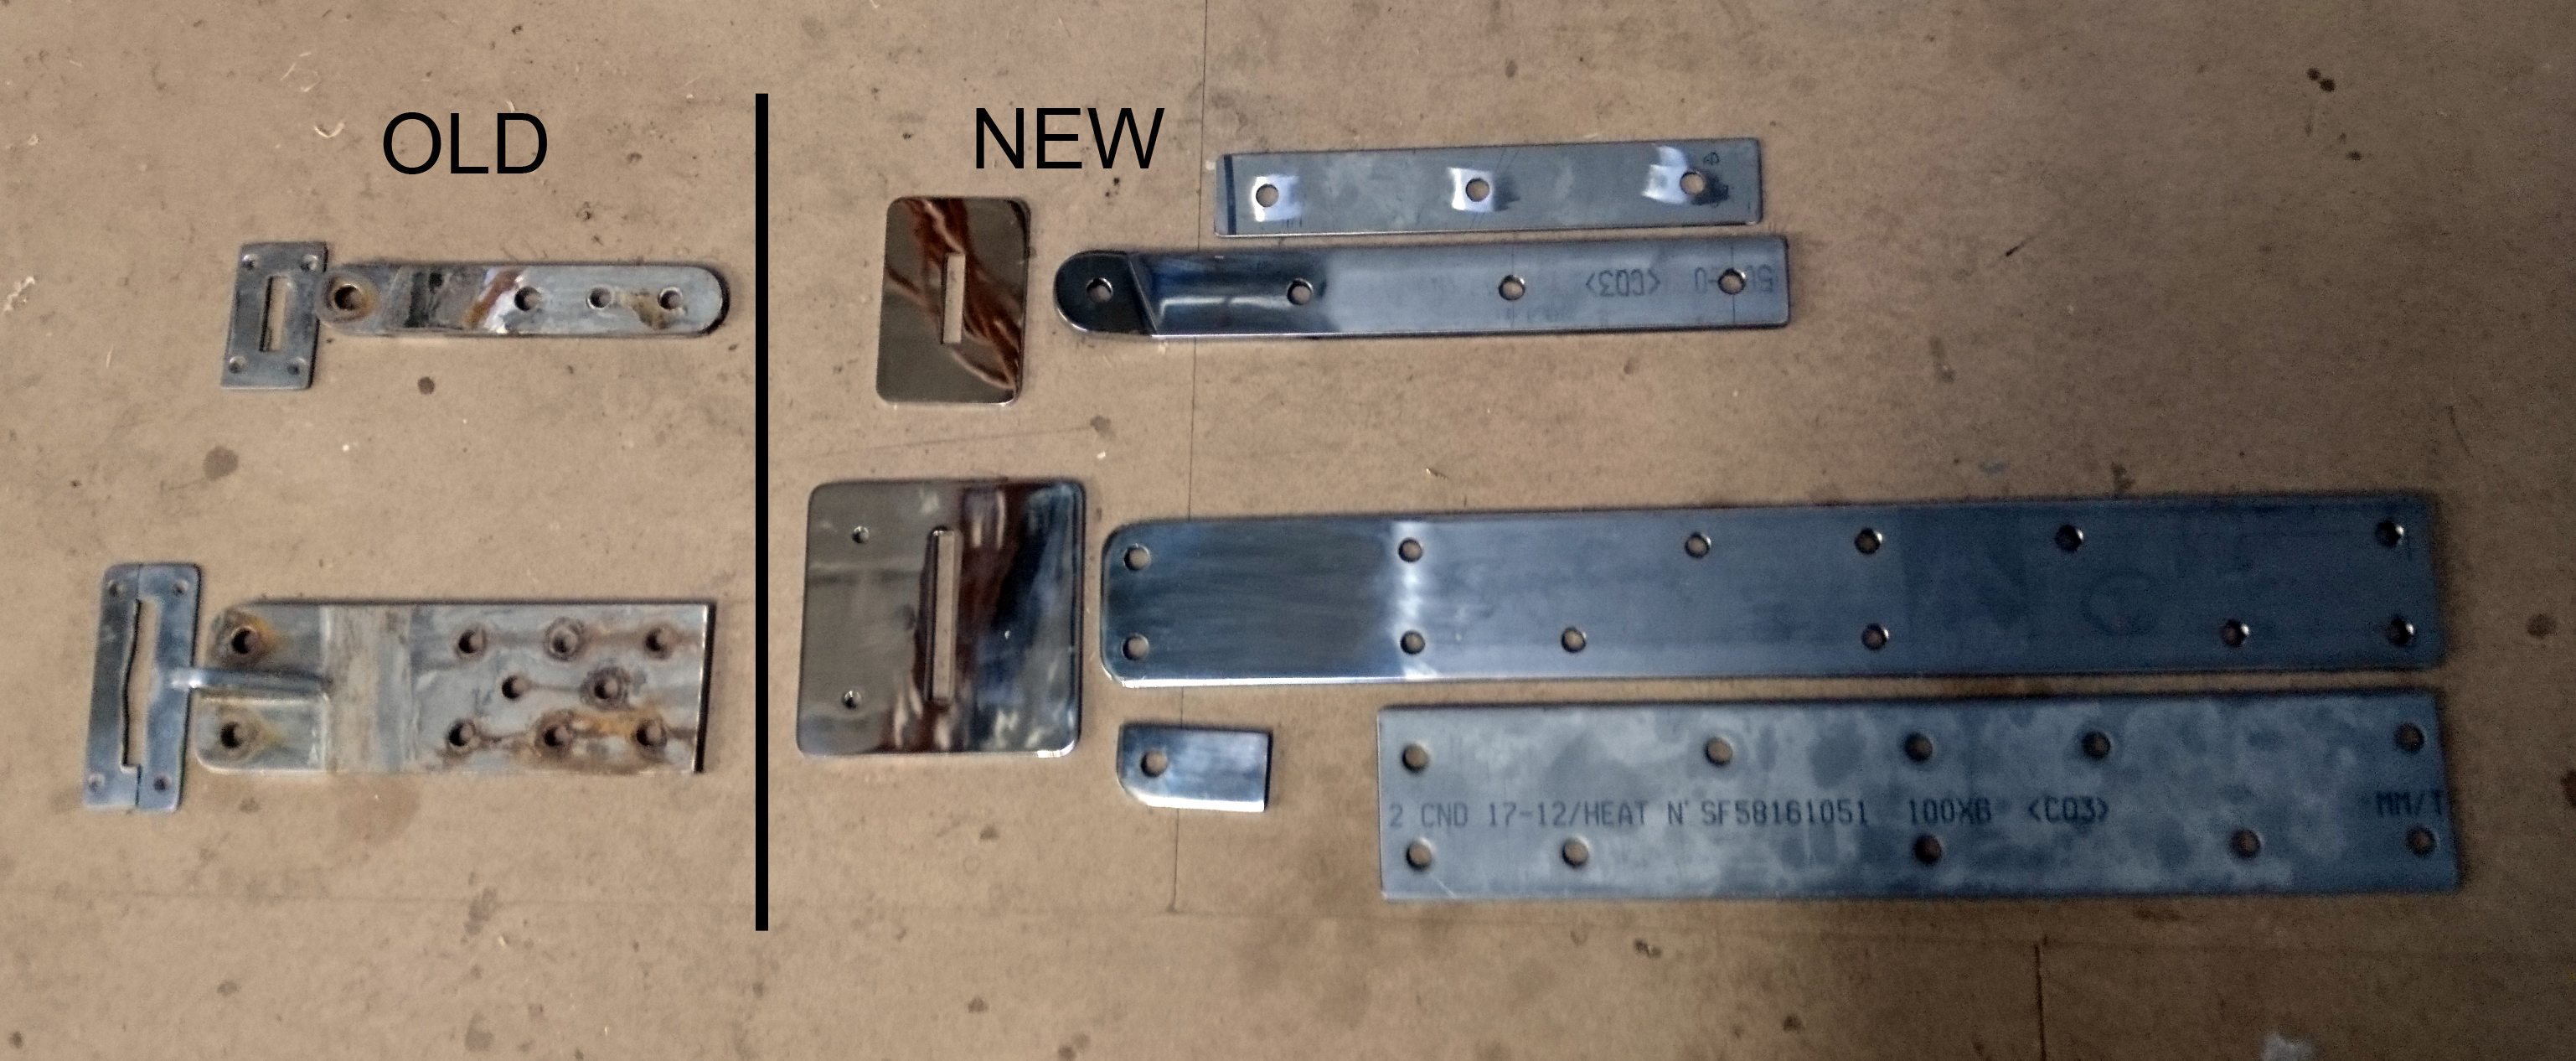
The new chain plates incorporating the large 150mm x 150mm deck plate to cover the deck repair.
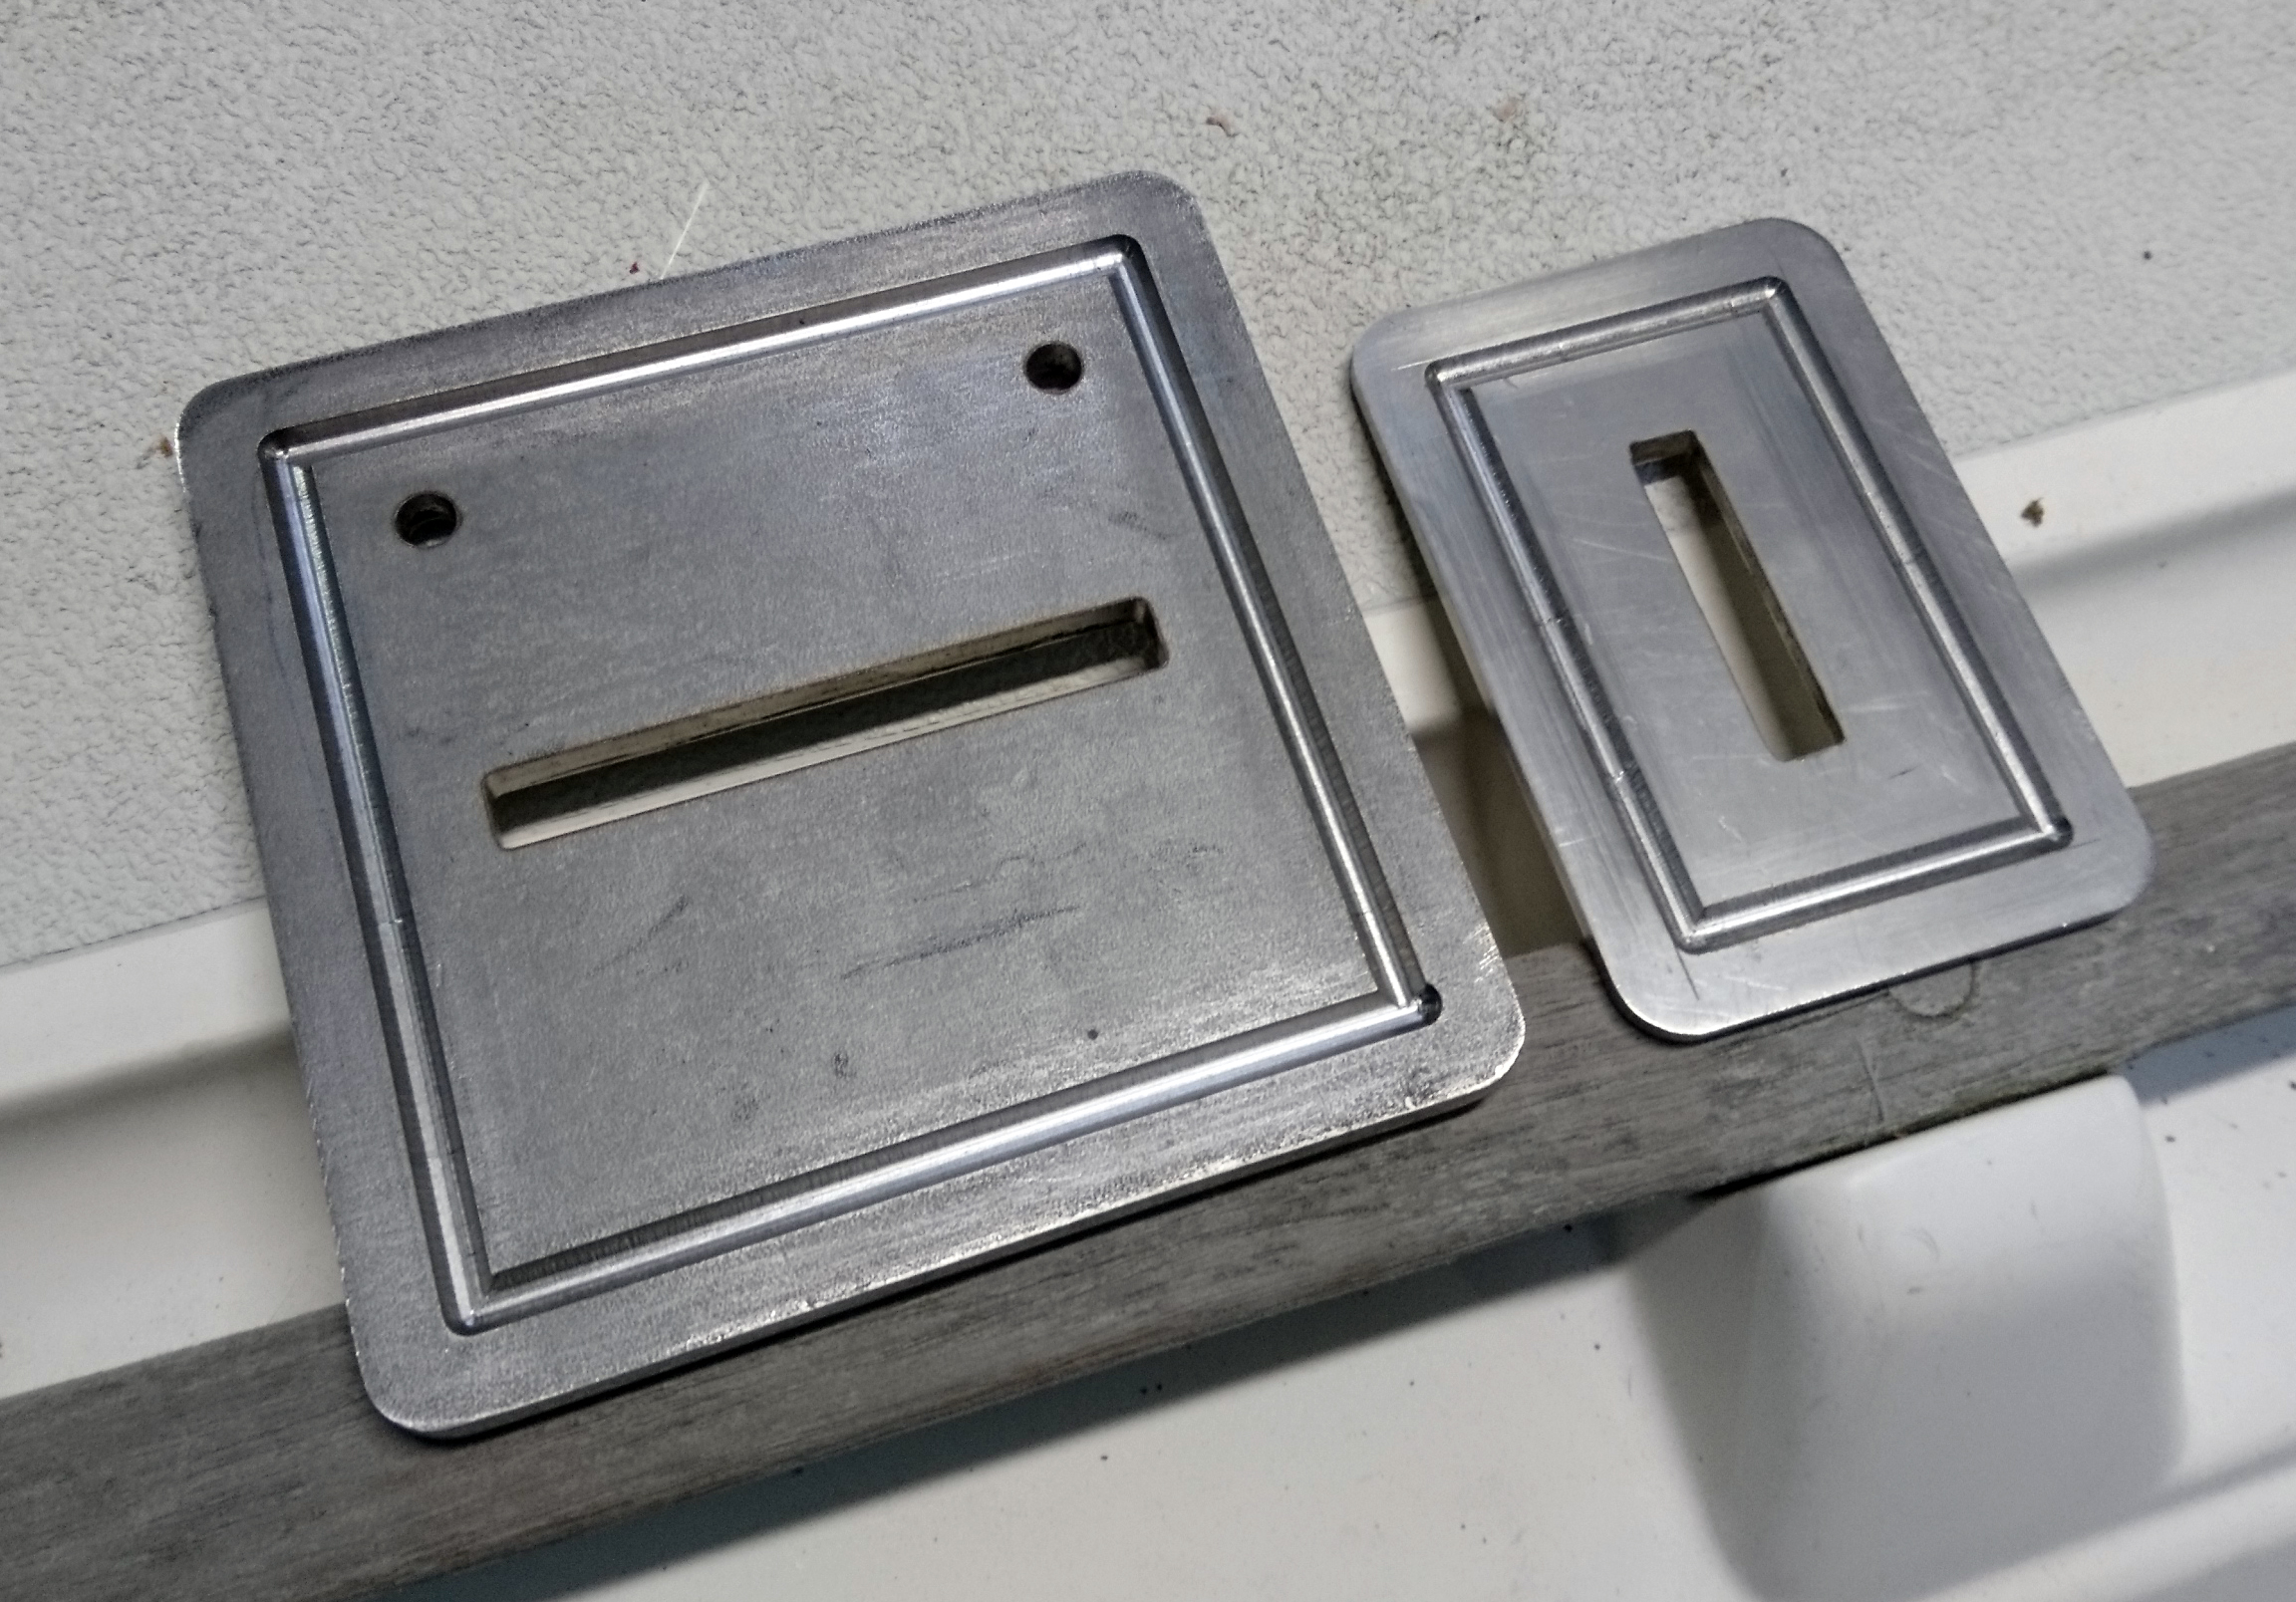
A recces in the underside of the deck plate to create a kind of o-ring effect.
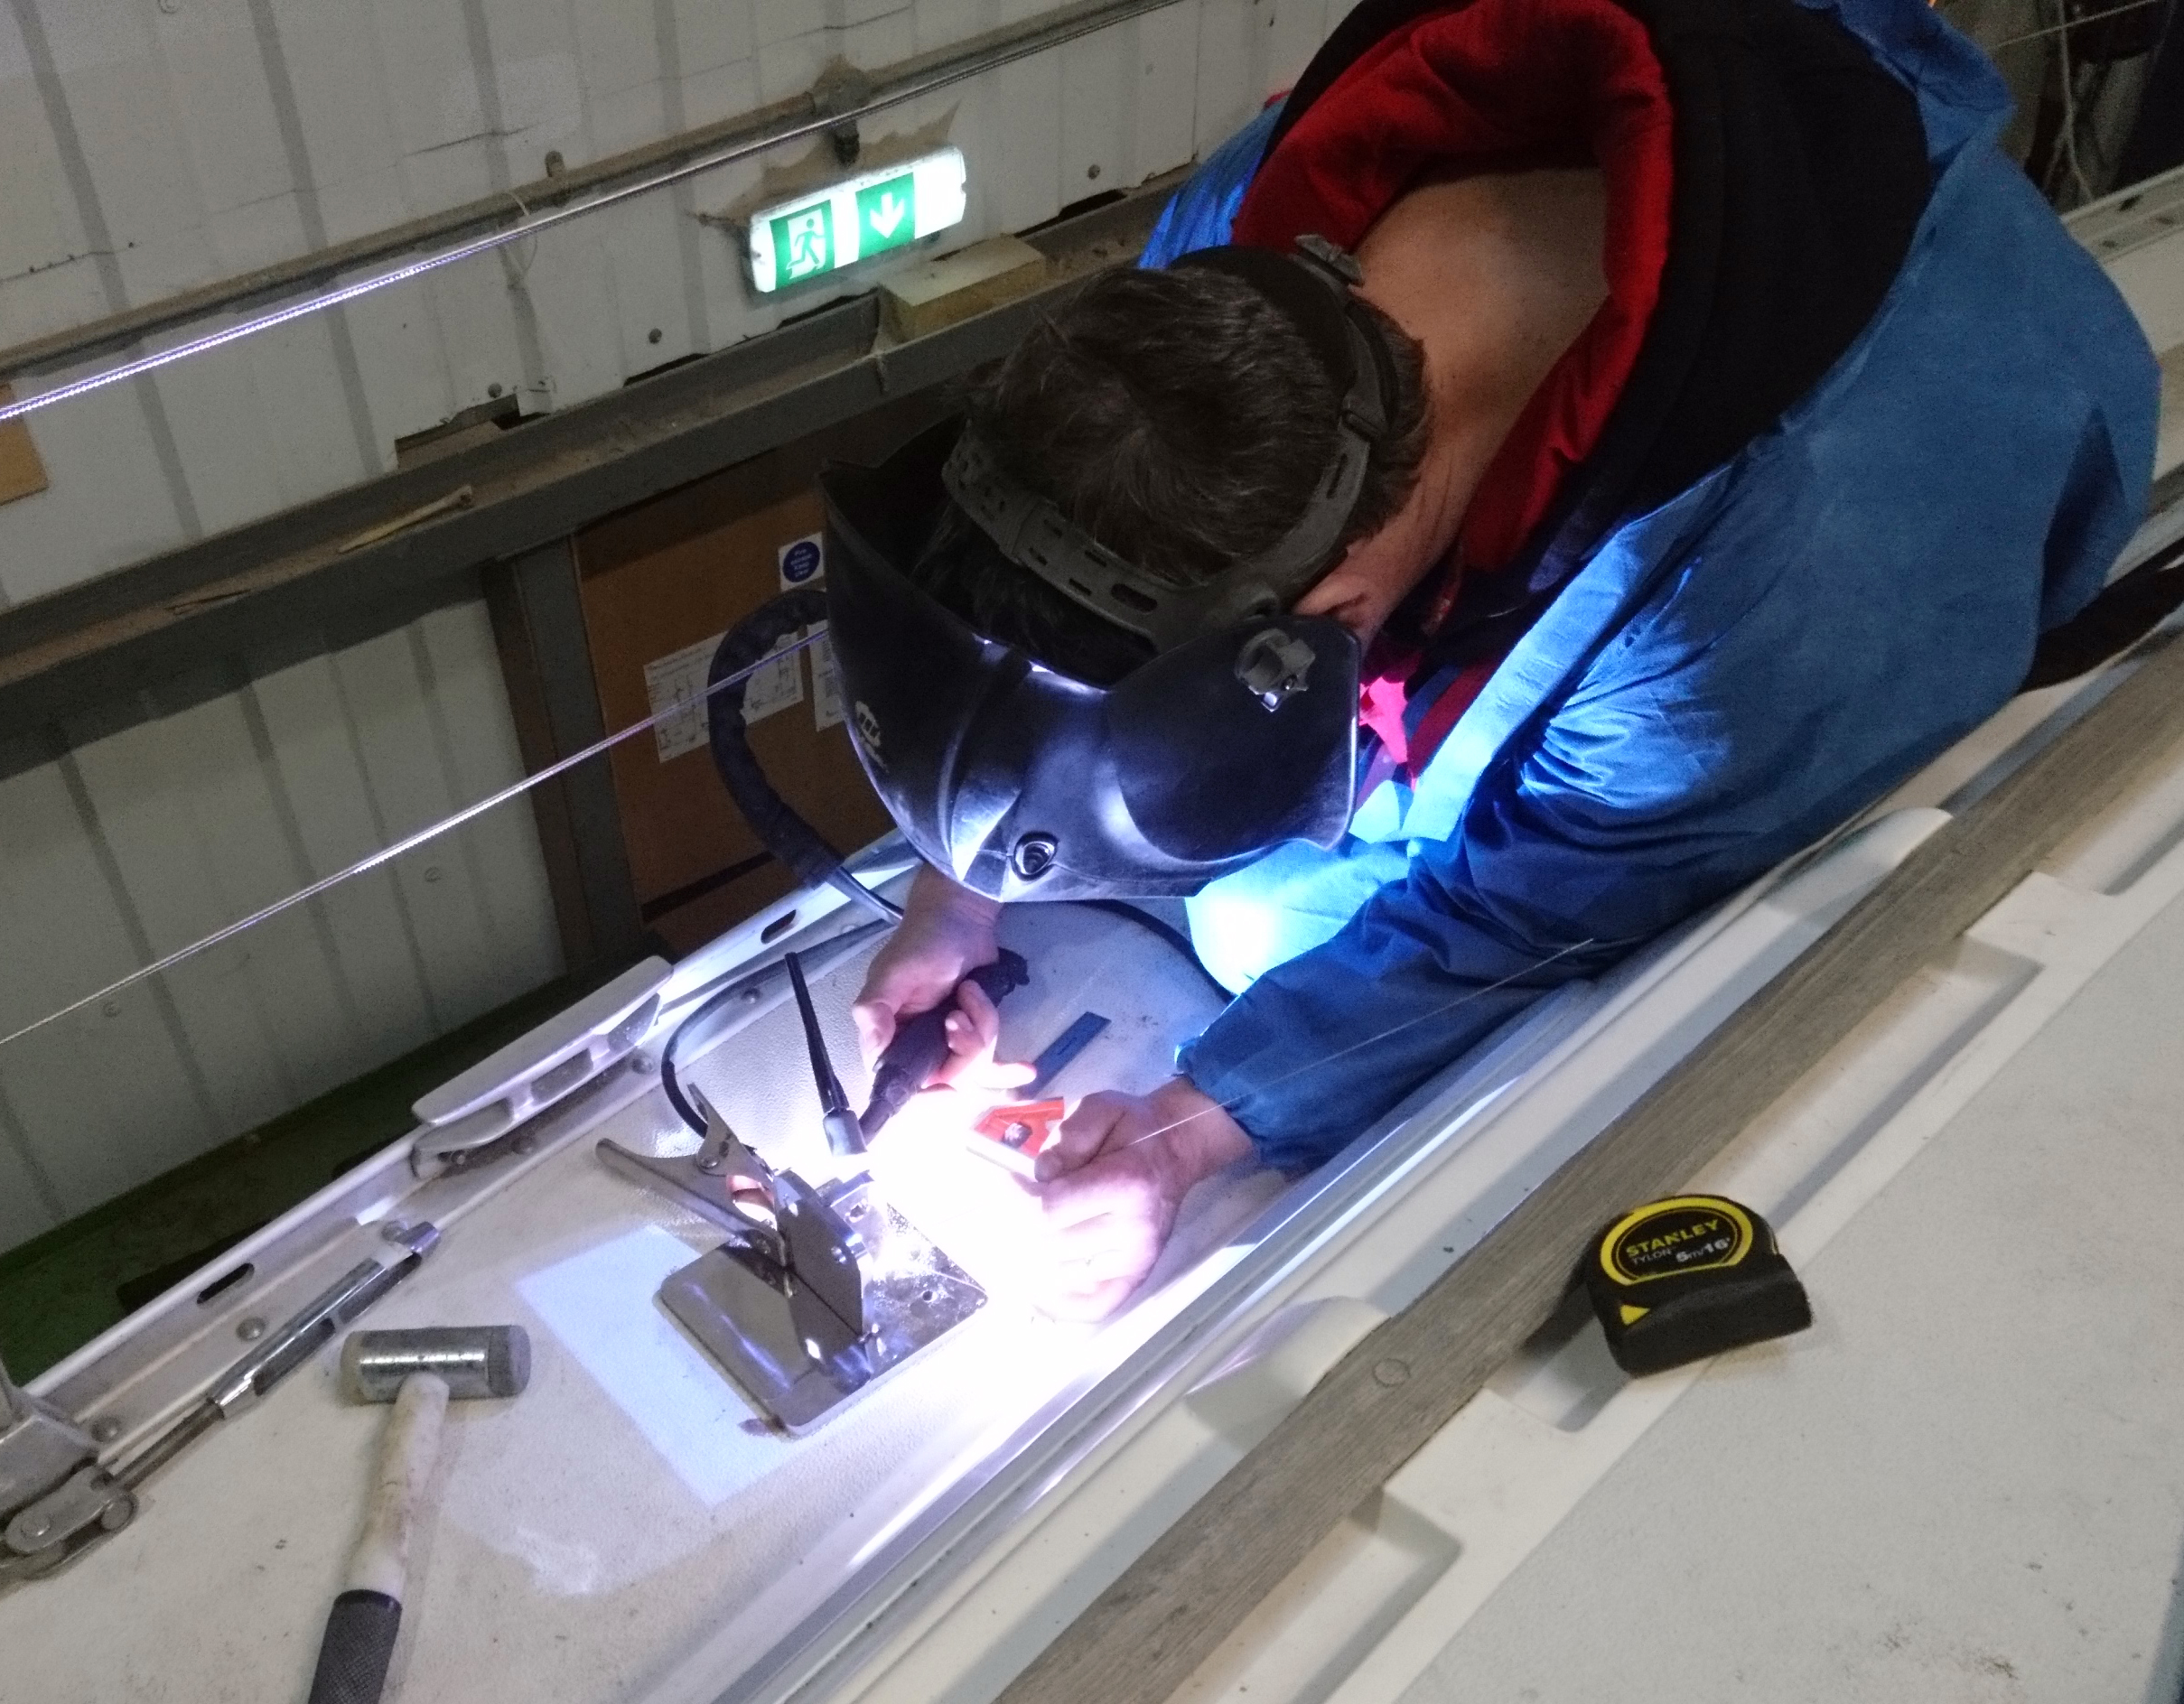
The deck plate is tack welded to the main plate in situ to ensure the correct deck compound angle.
Once tack welded the plates are taken away to be fully welded and a final polish.
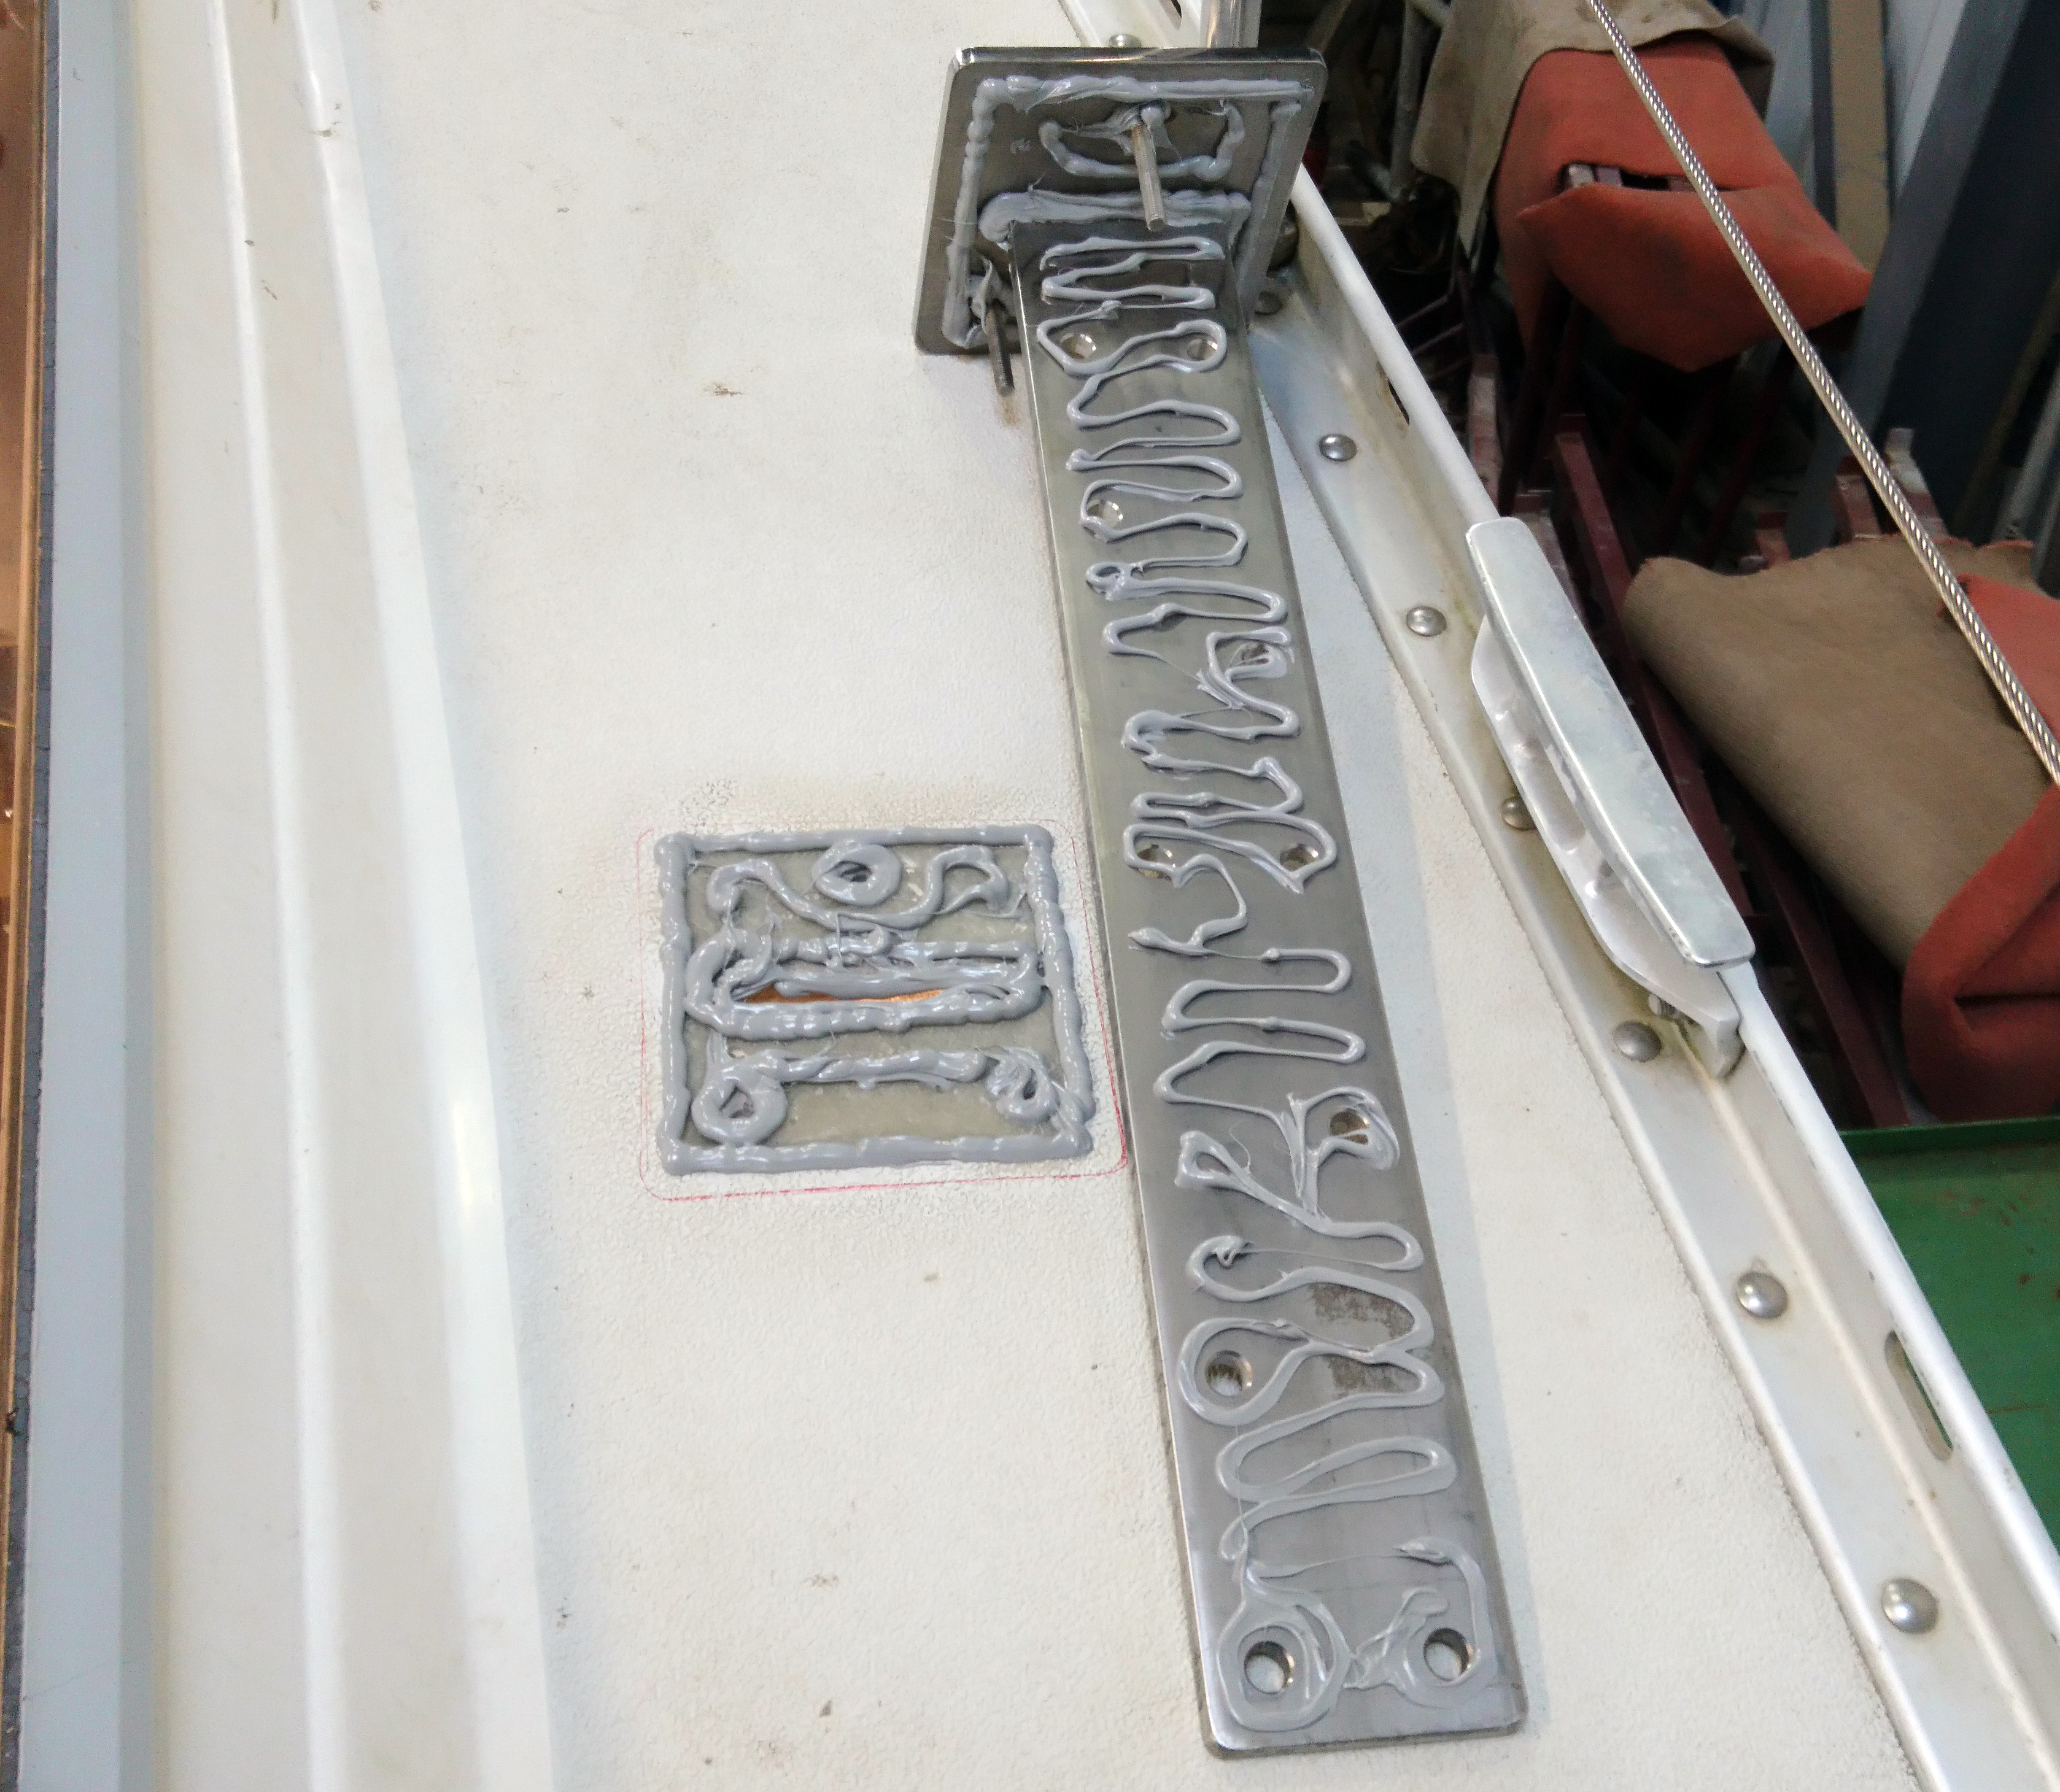
A liberal application of Arbokol 1000 concentrating on edges and round fasteners.
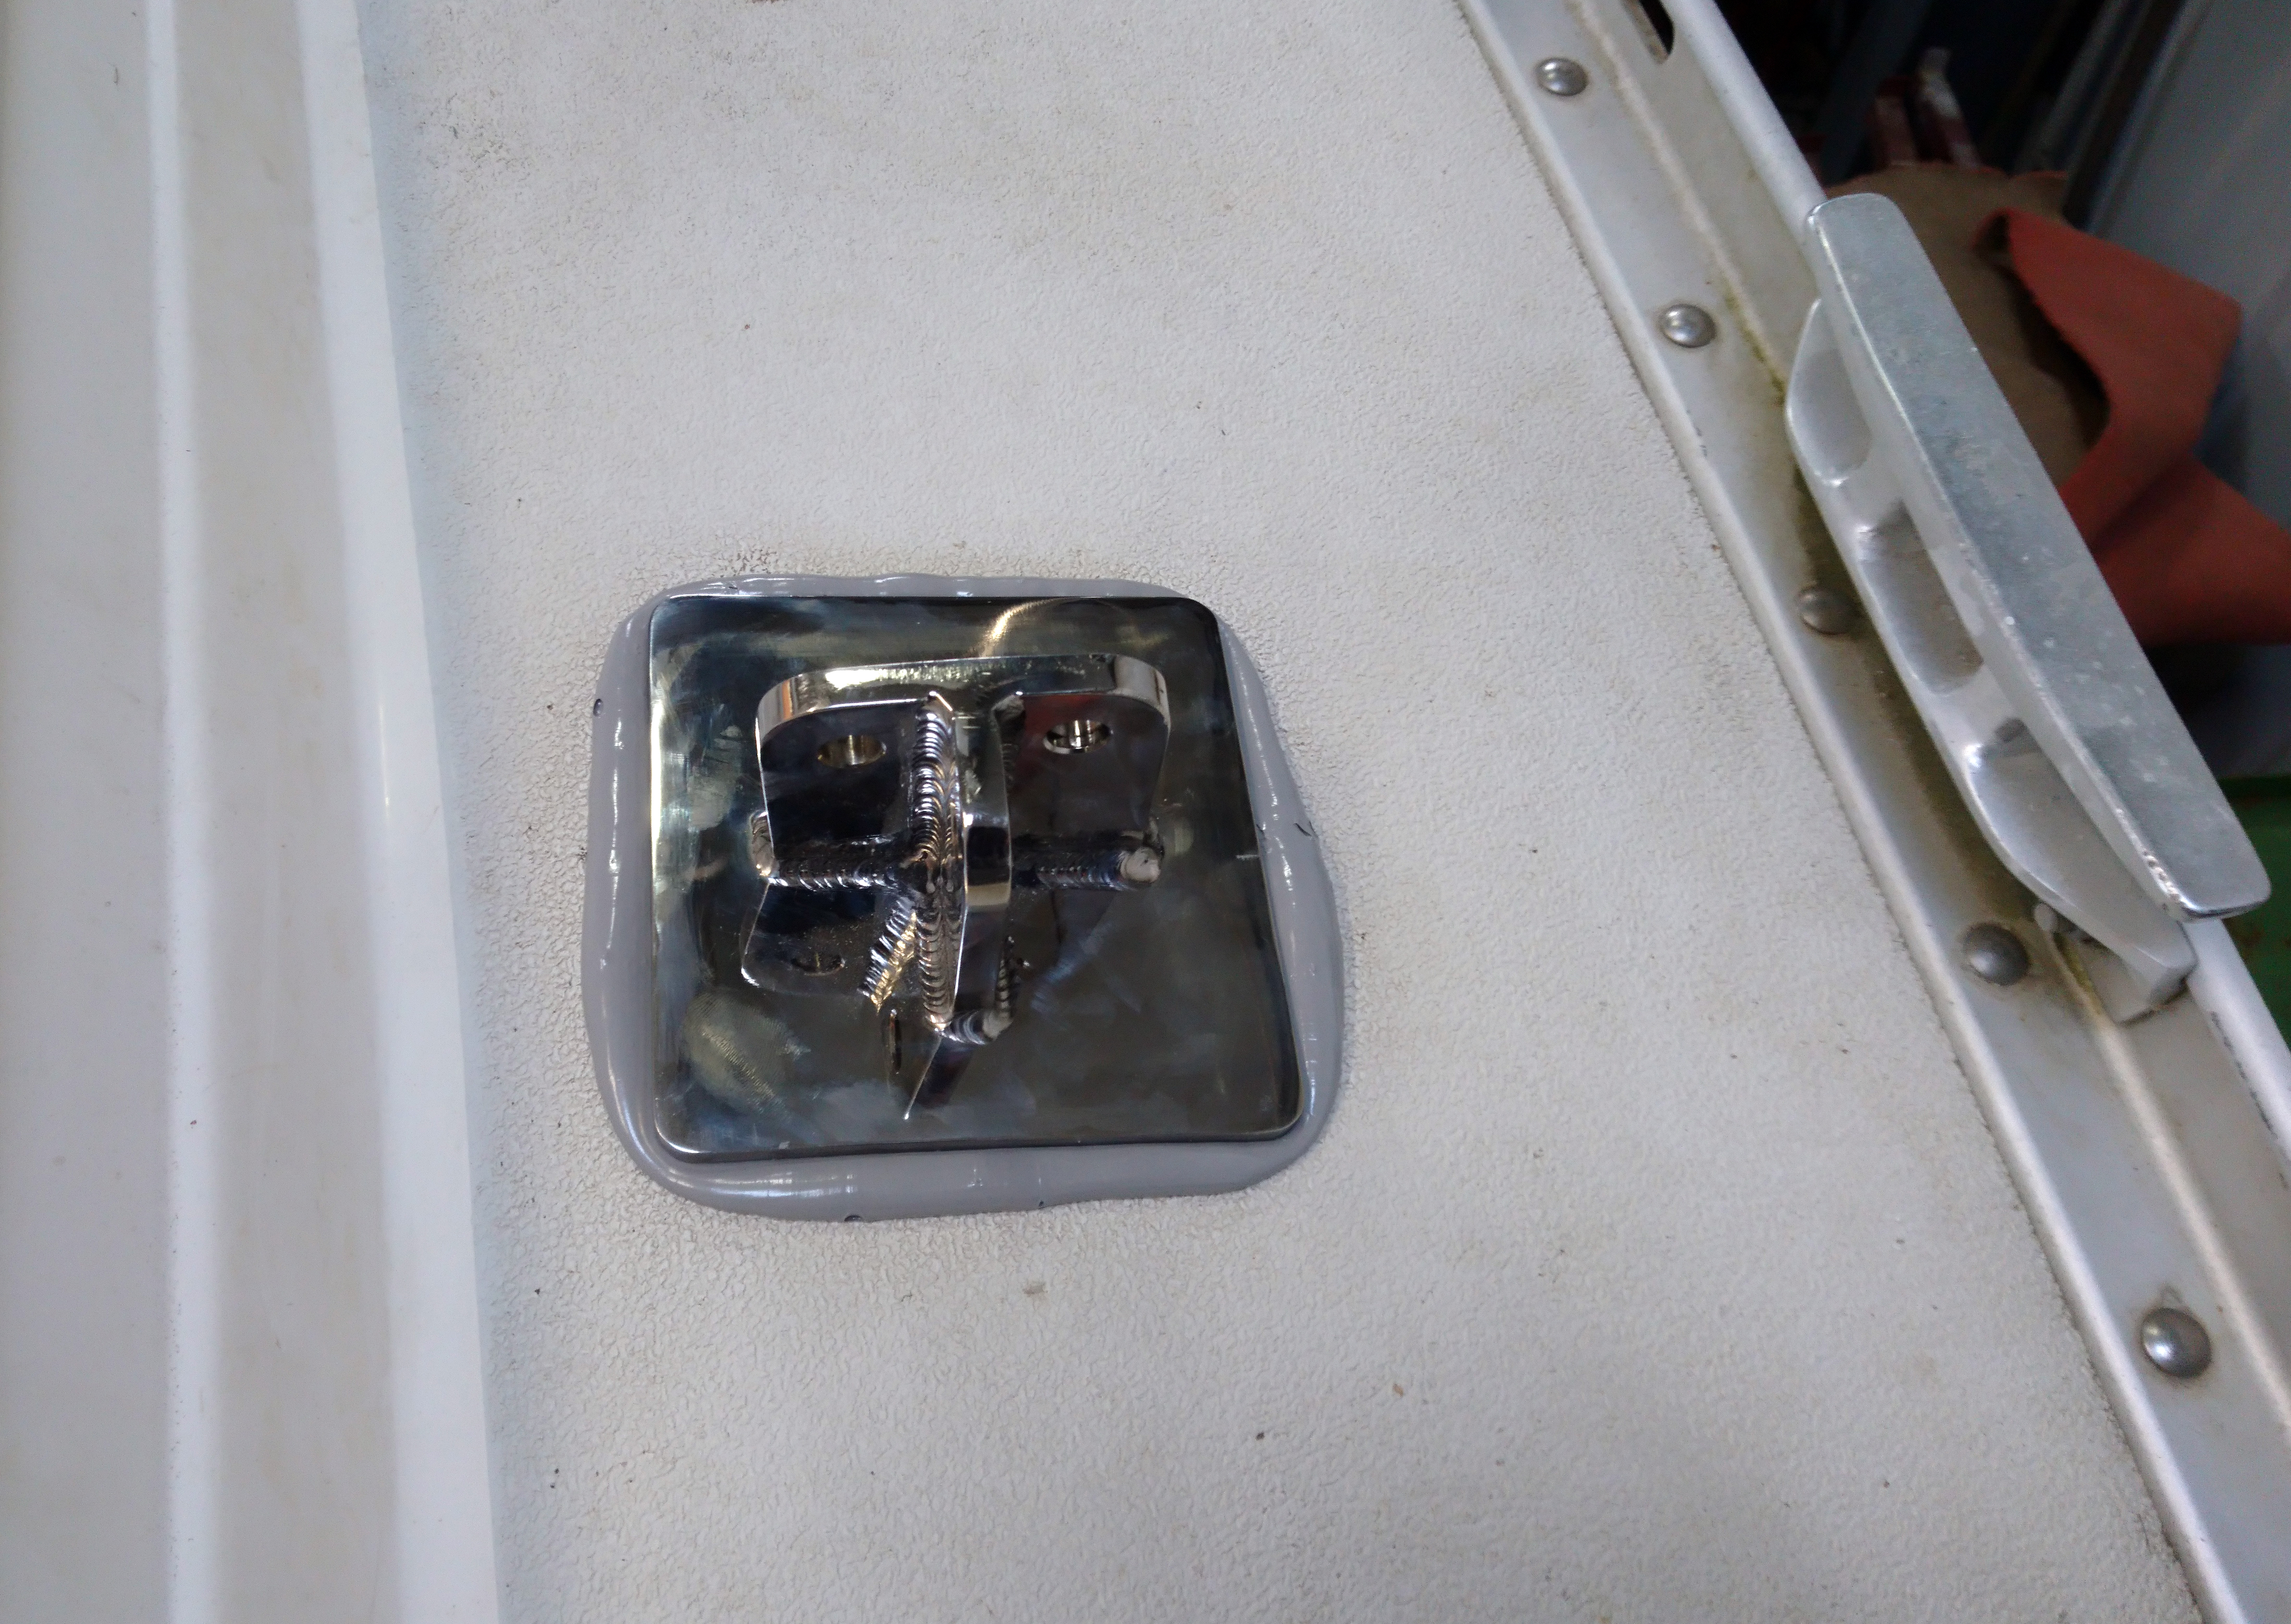
Pulling down the deck plate from below should squeeze out surplus all the way round. Any areas you don’t get any surplus need to be checked and may require you to reset the deck plate.
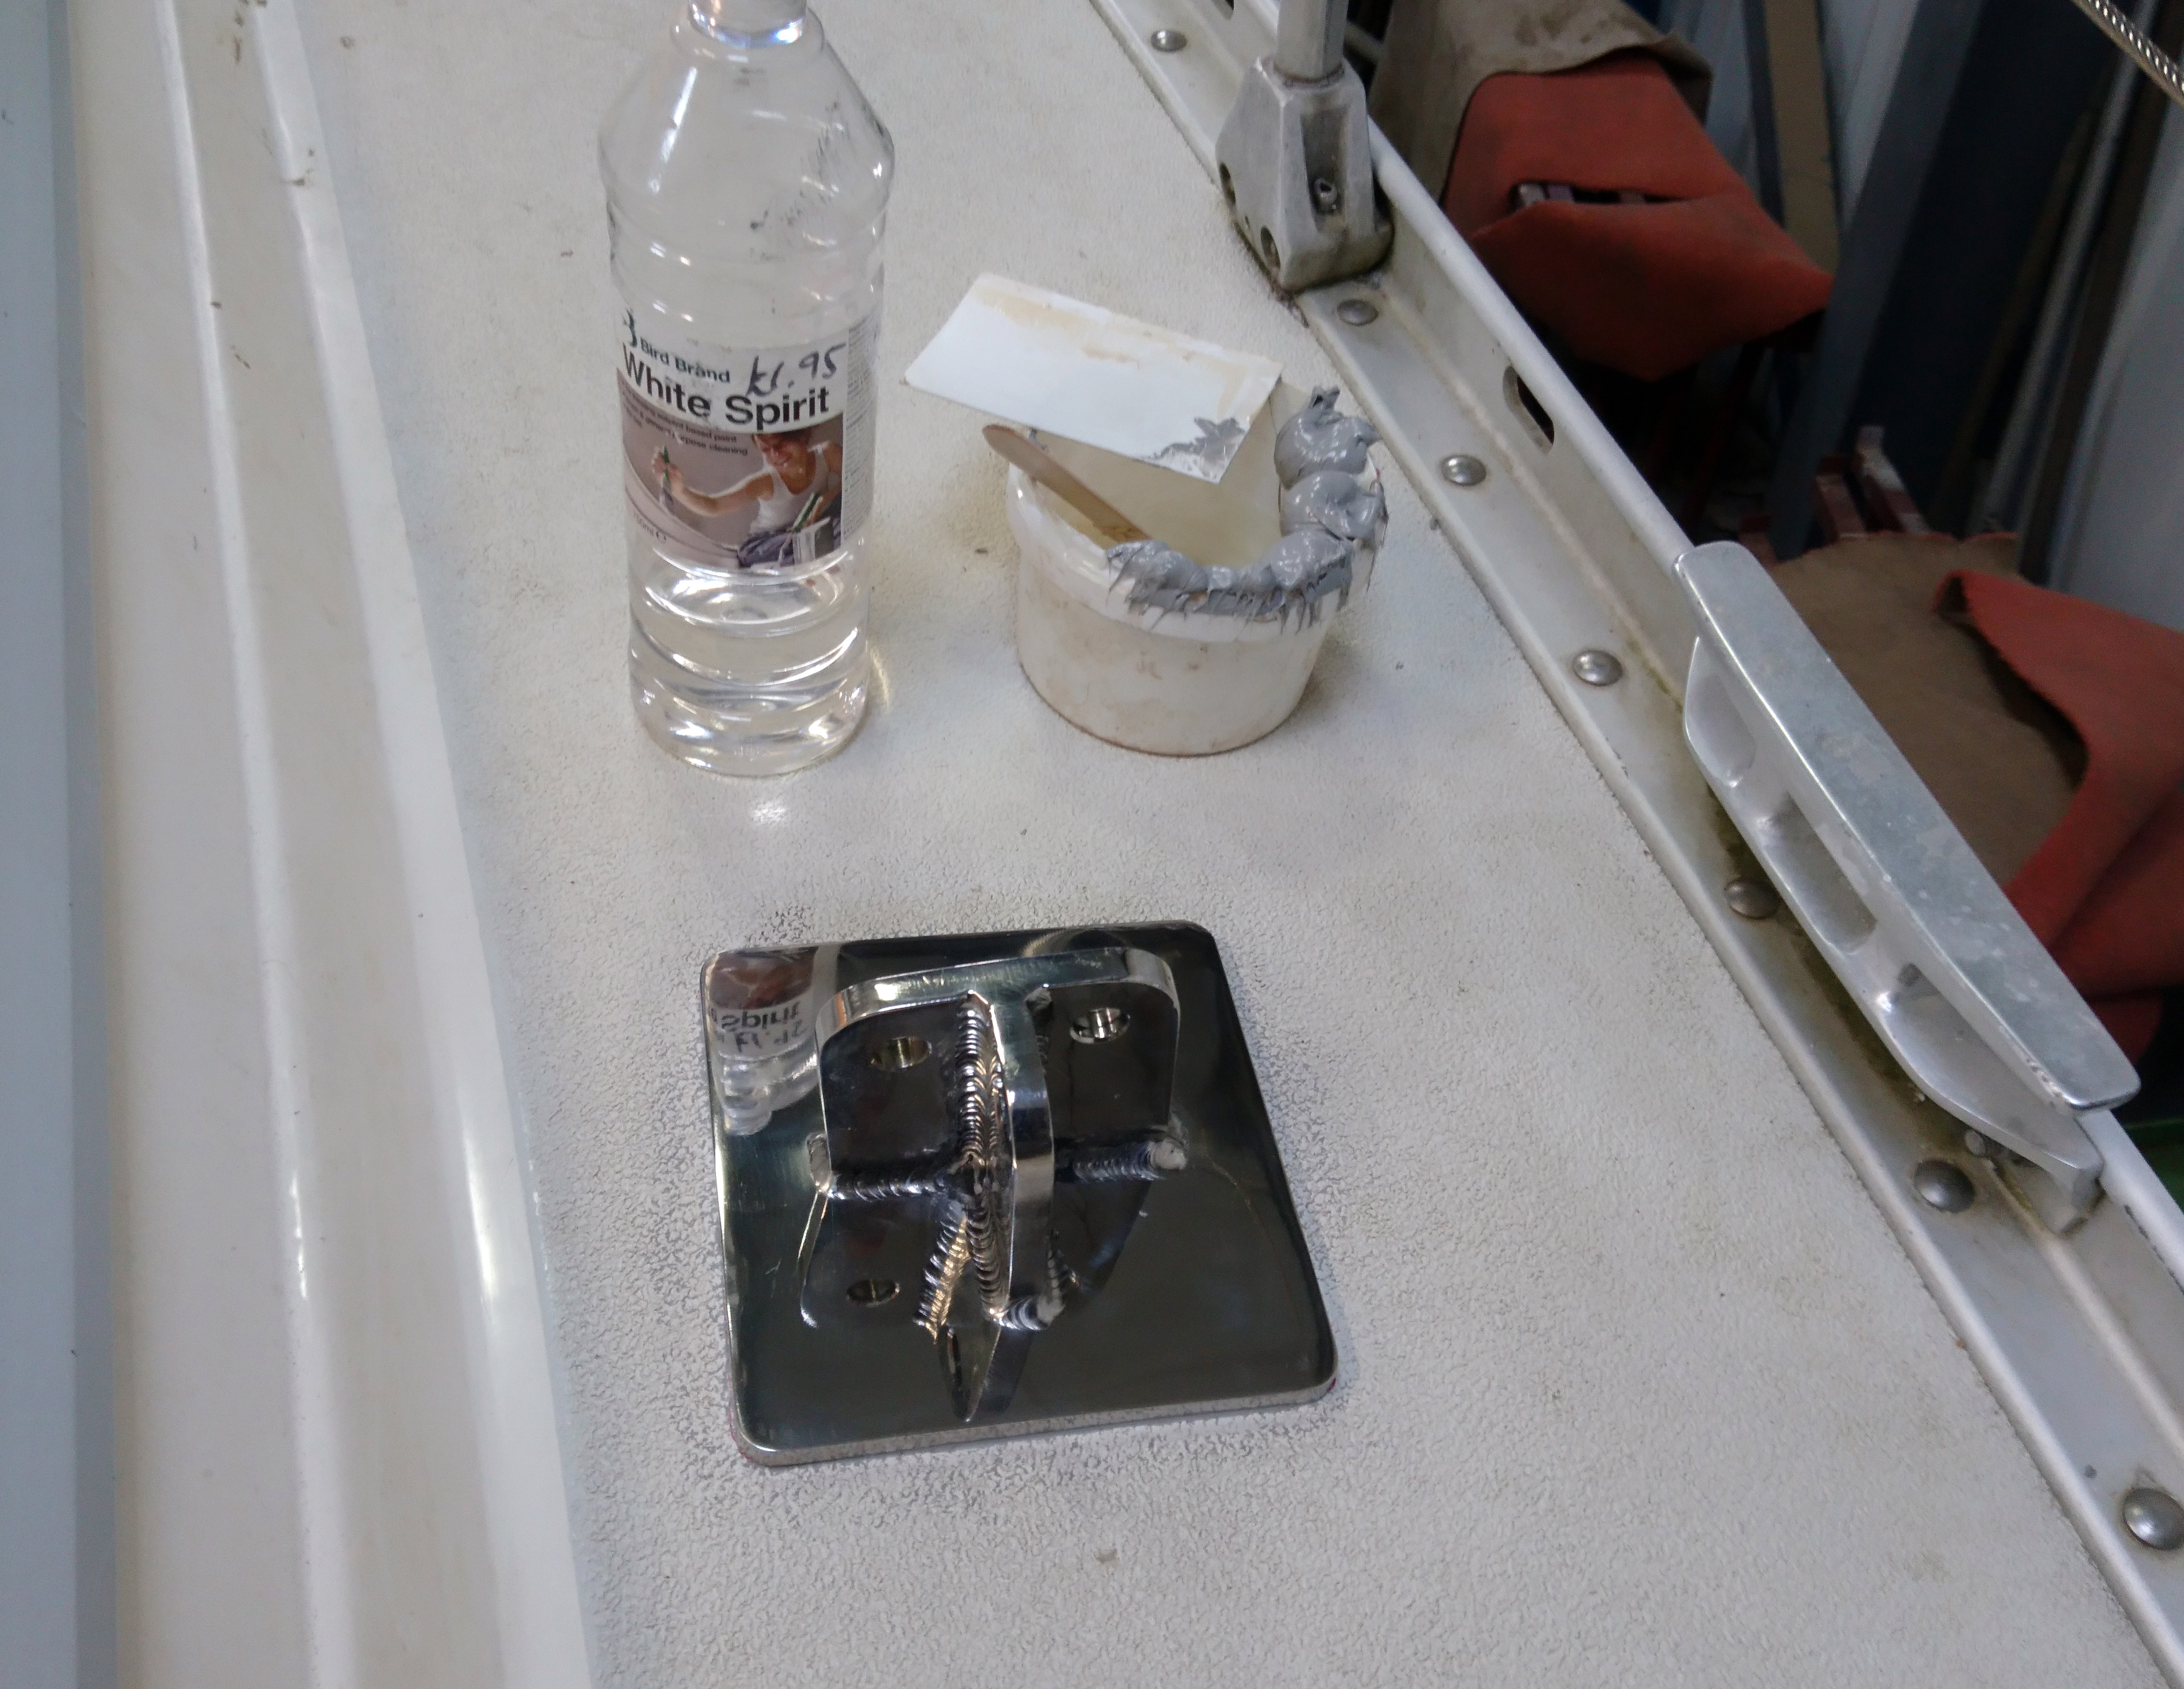
Cleaning up is easy with a plastic card and white spirit.

The staining just aft of the deck plate is old glue from some treadmaster.

The forward lowers chain plate is thicker and longer to stop the flex of the original.
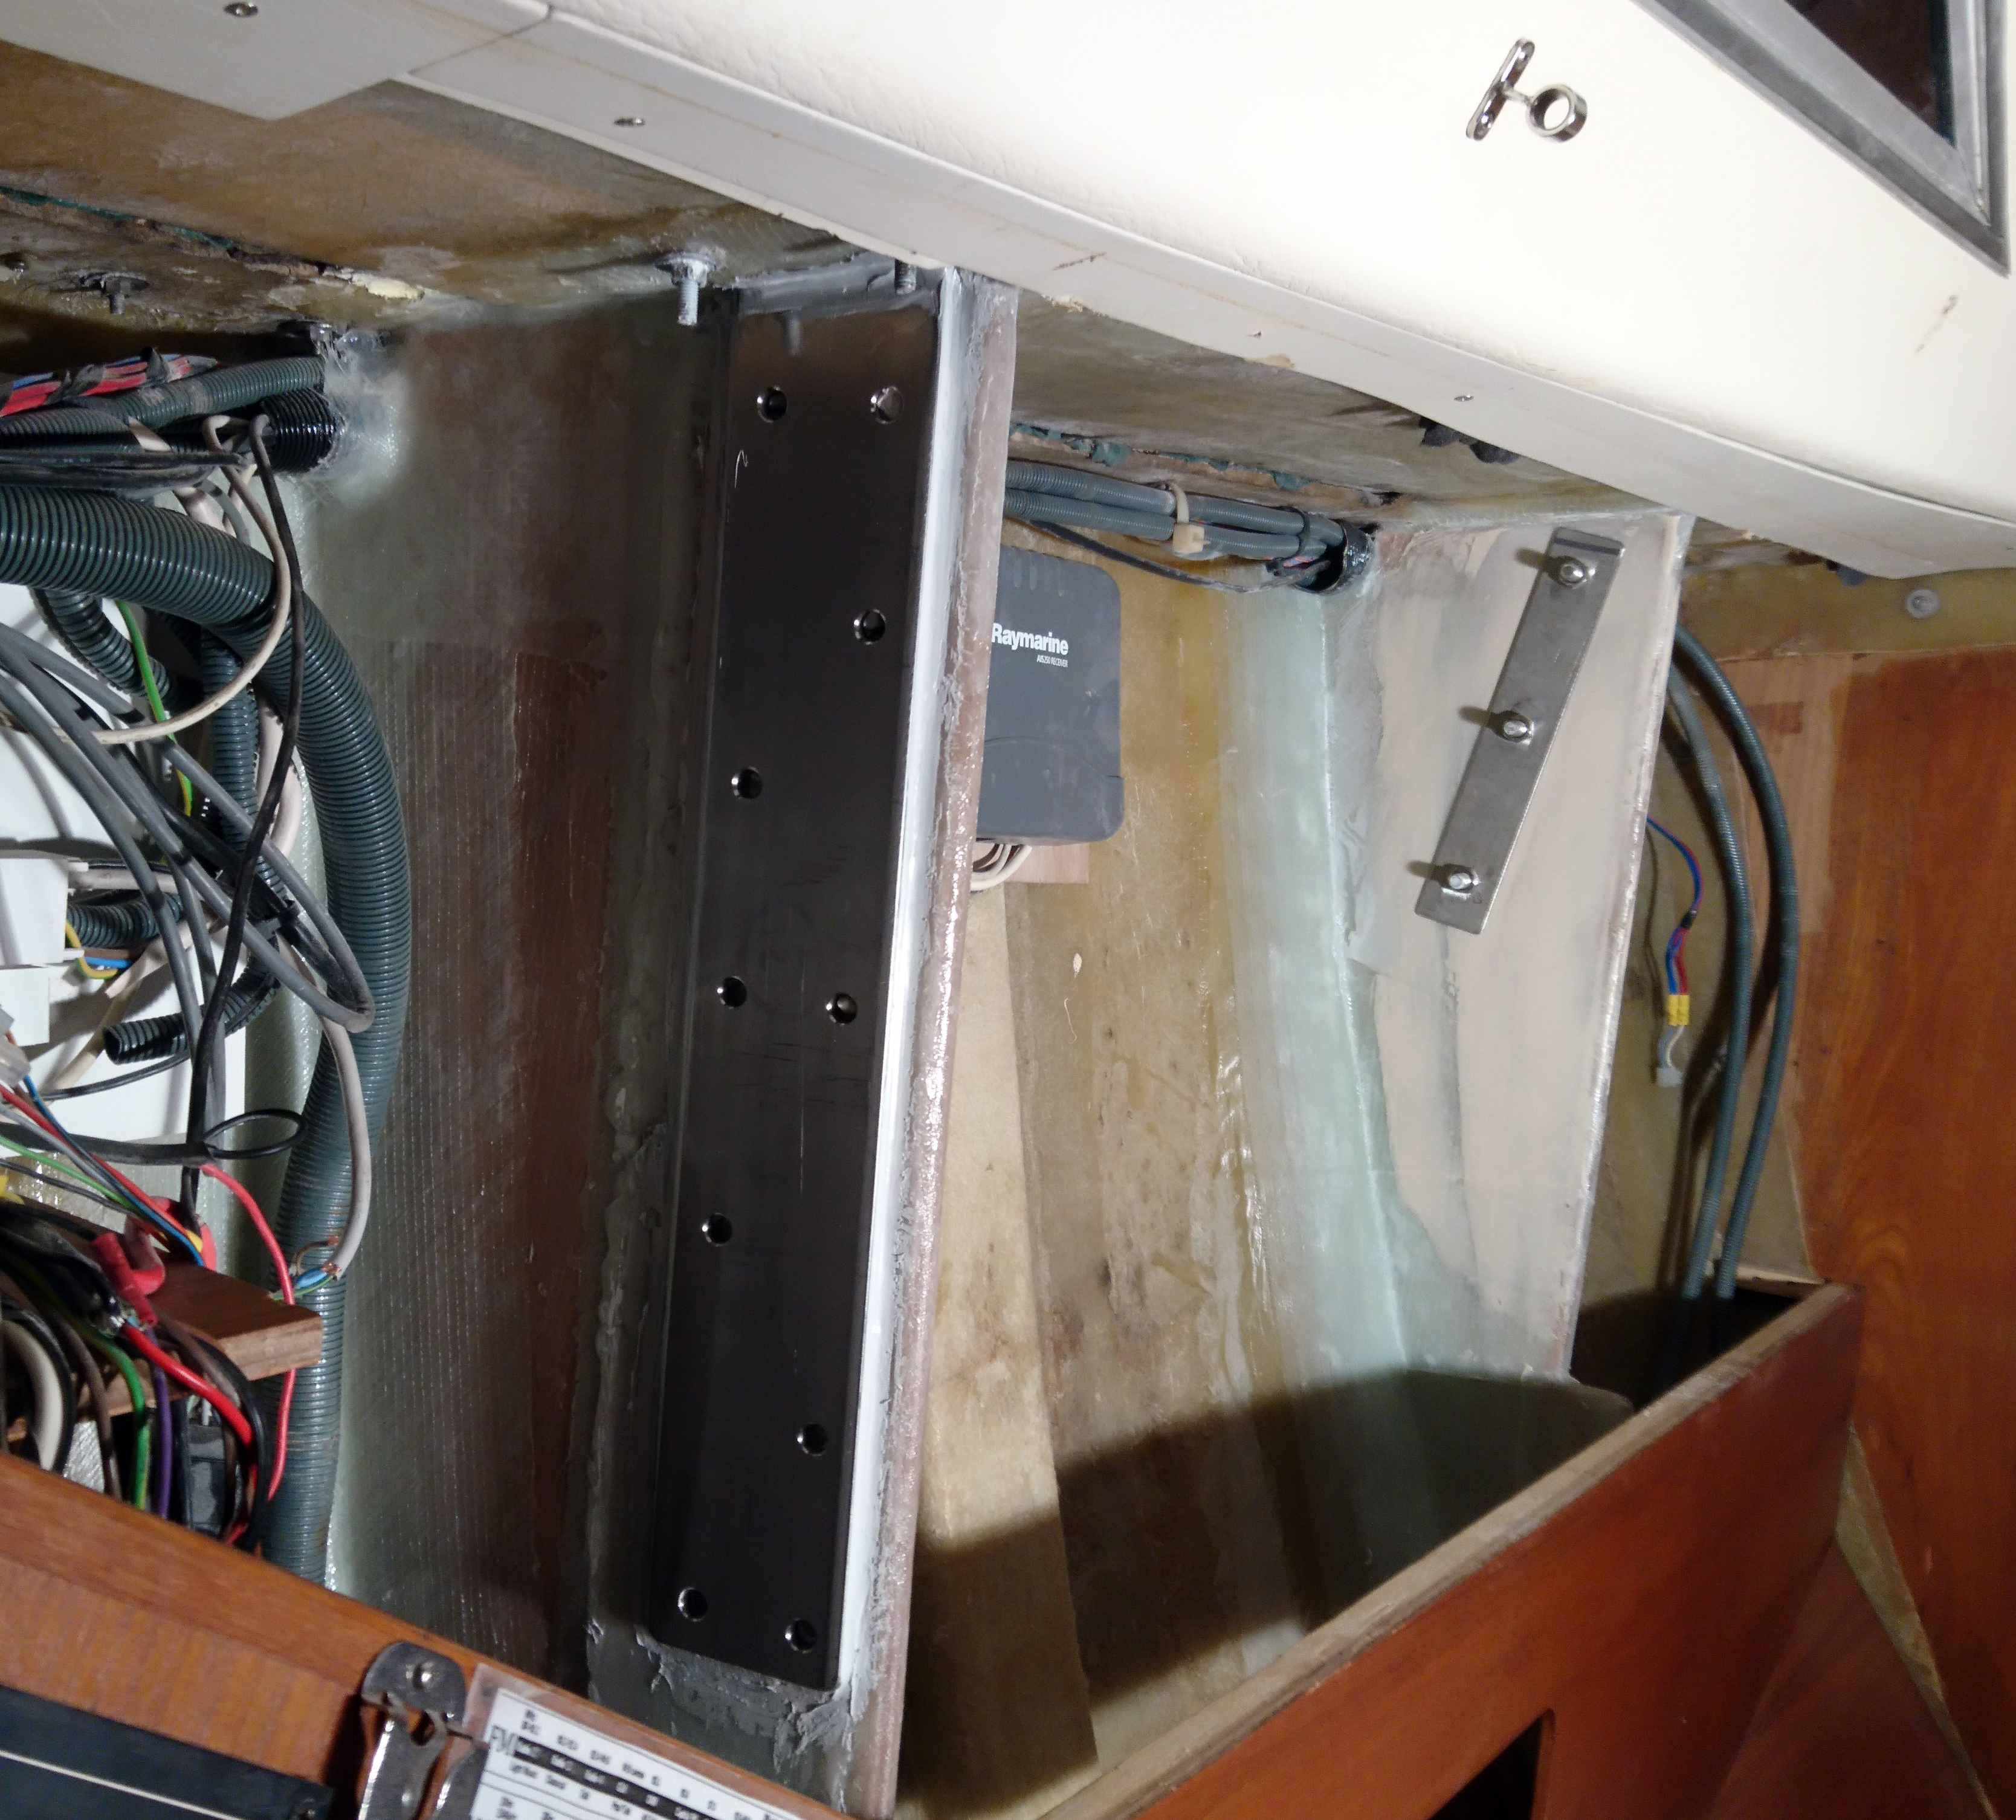
Chain plate in position ready for final m12 drilling through the prepared m25 epoxy plugs.

The 10 x mounting bolts are spread over a much greater area reducing point loading.
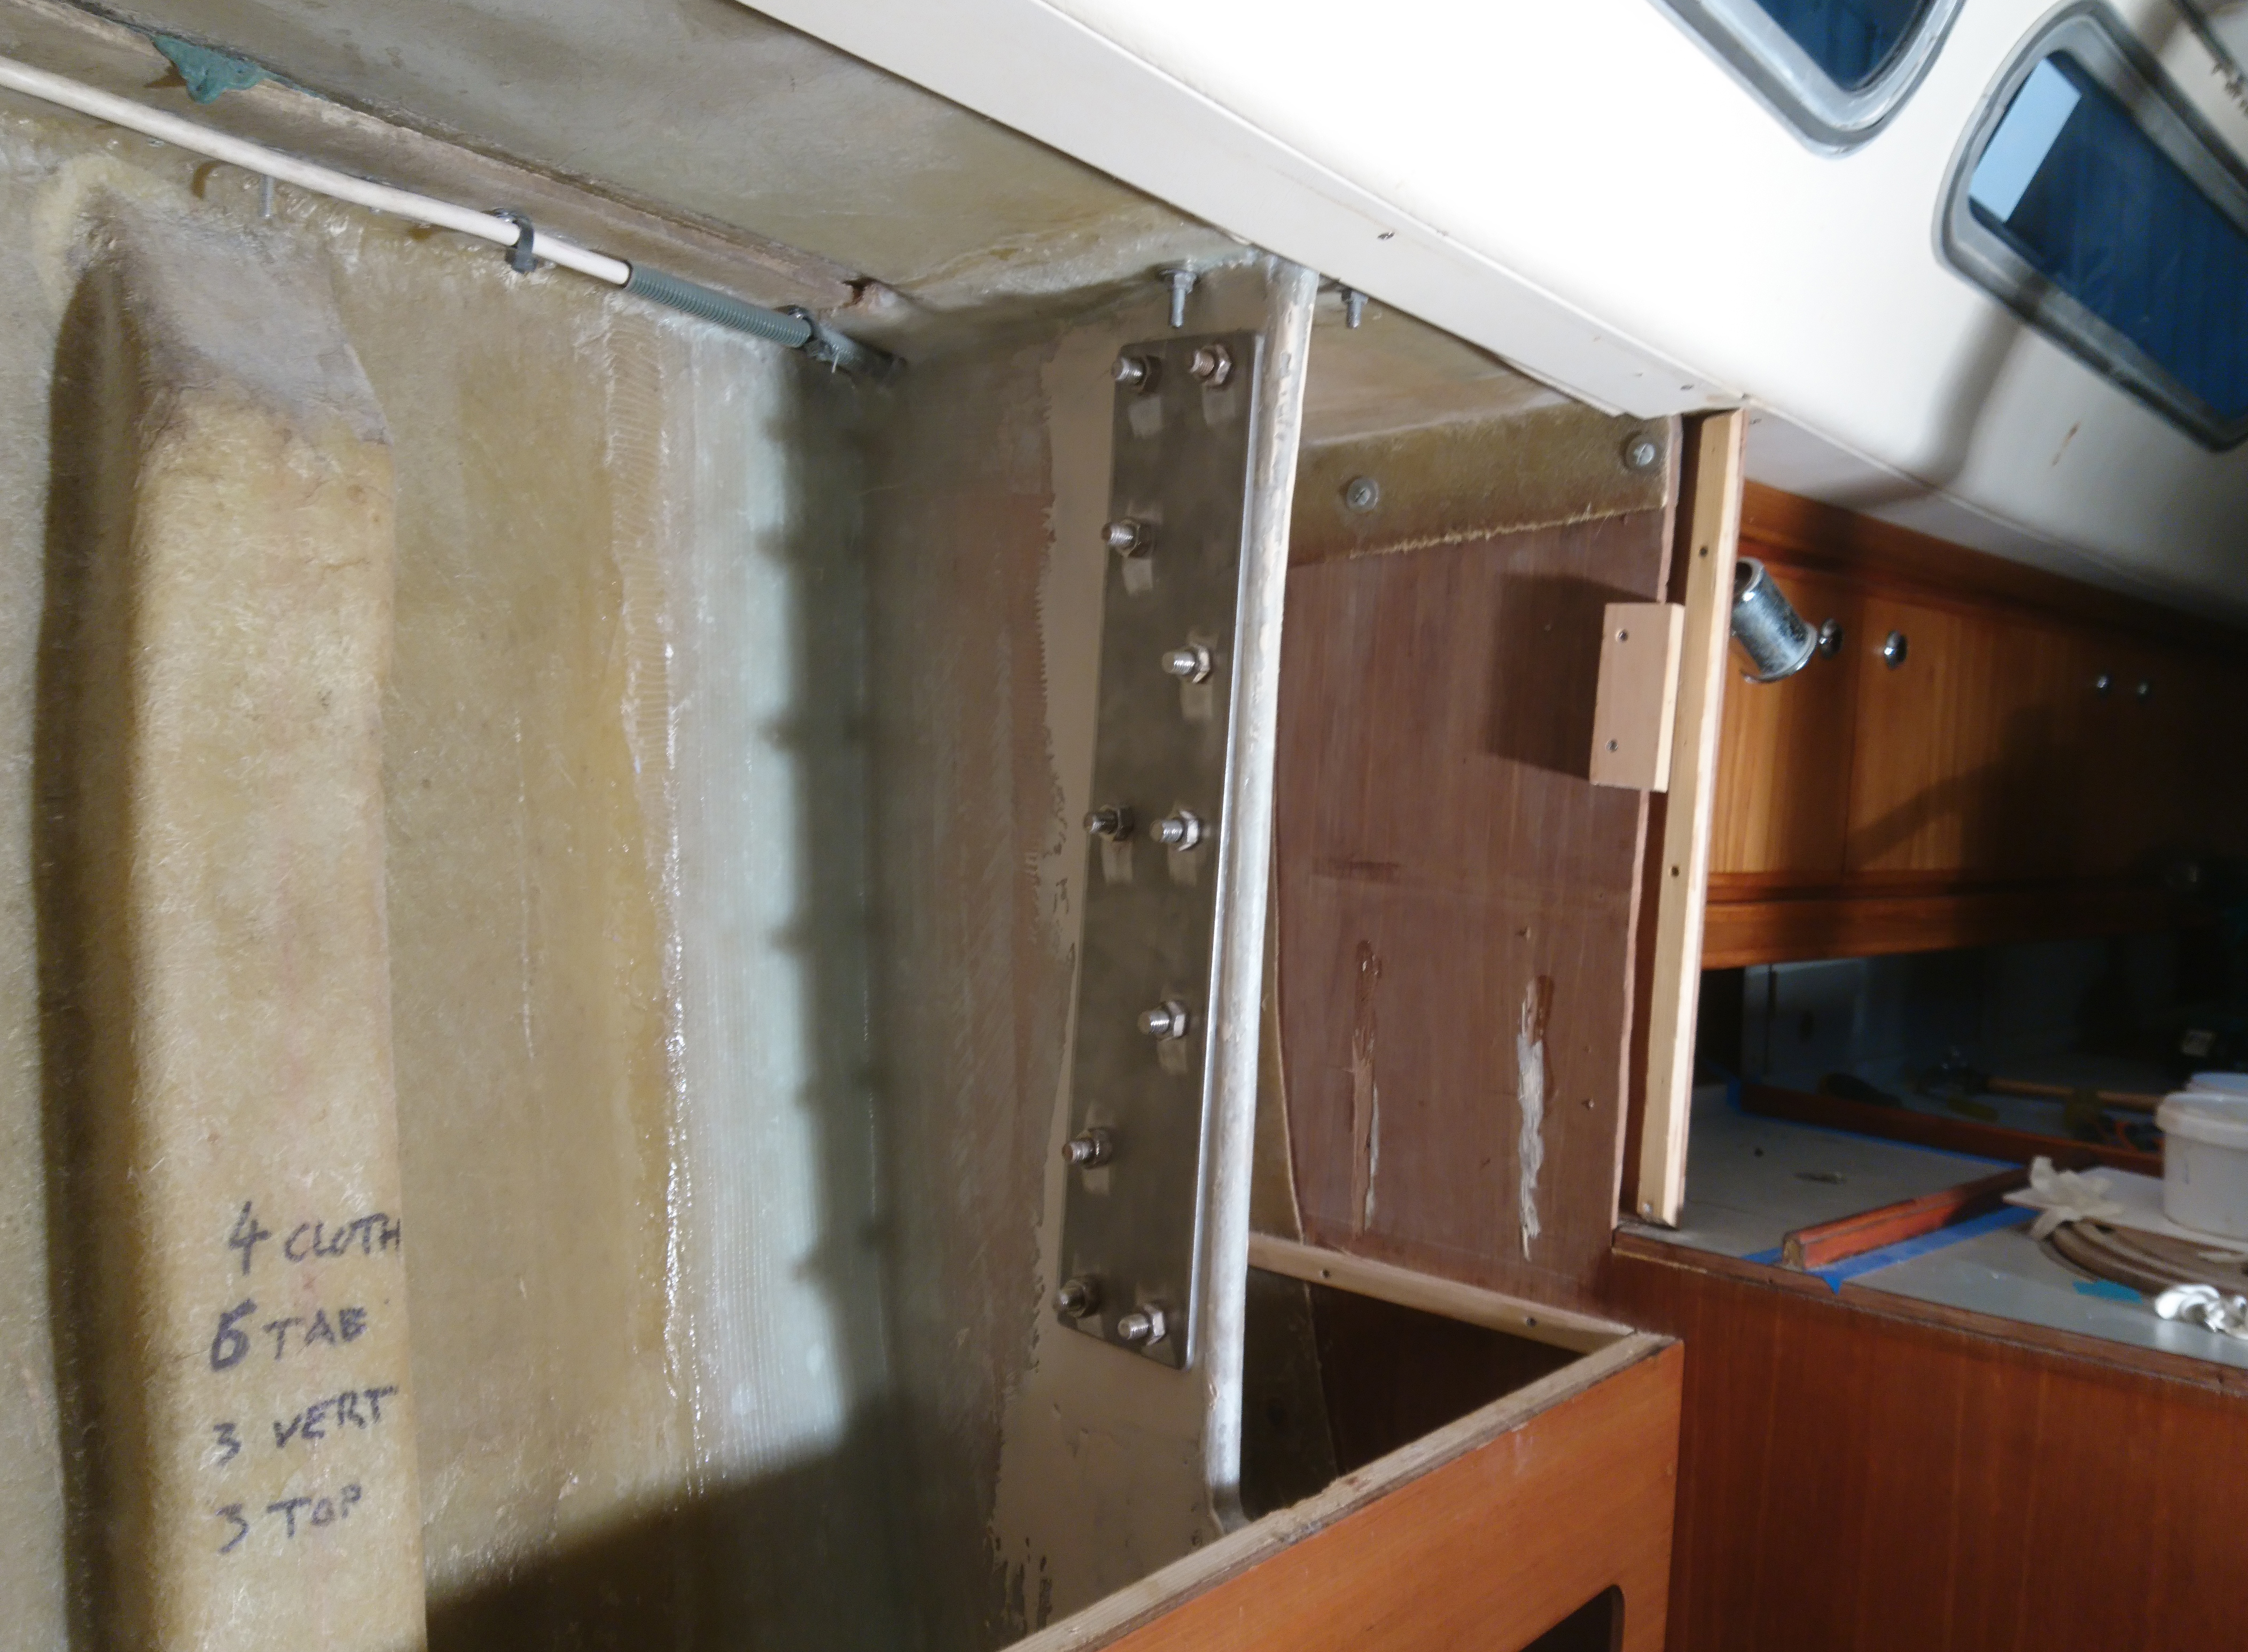
The full length backing plate is double the thickness of the original, again spreading the load over a wider area.
Initial sketch of Chain plate solution on Passport 40.
We increased steel section to 10mm x 90mm and dispensed with the studs.
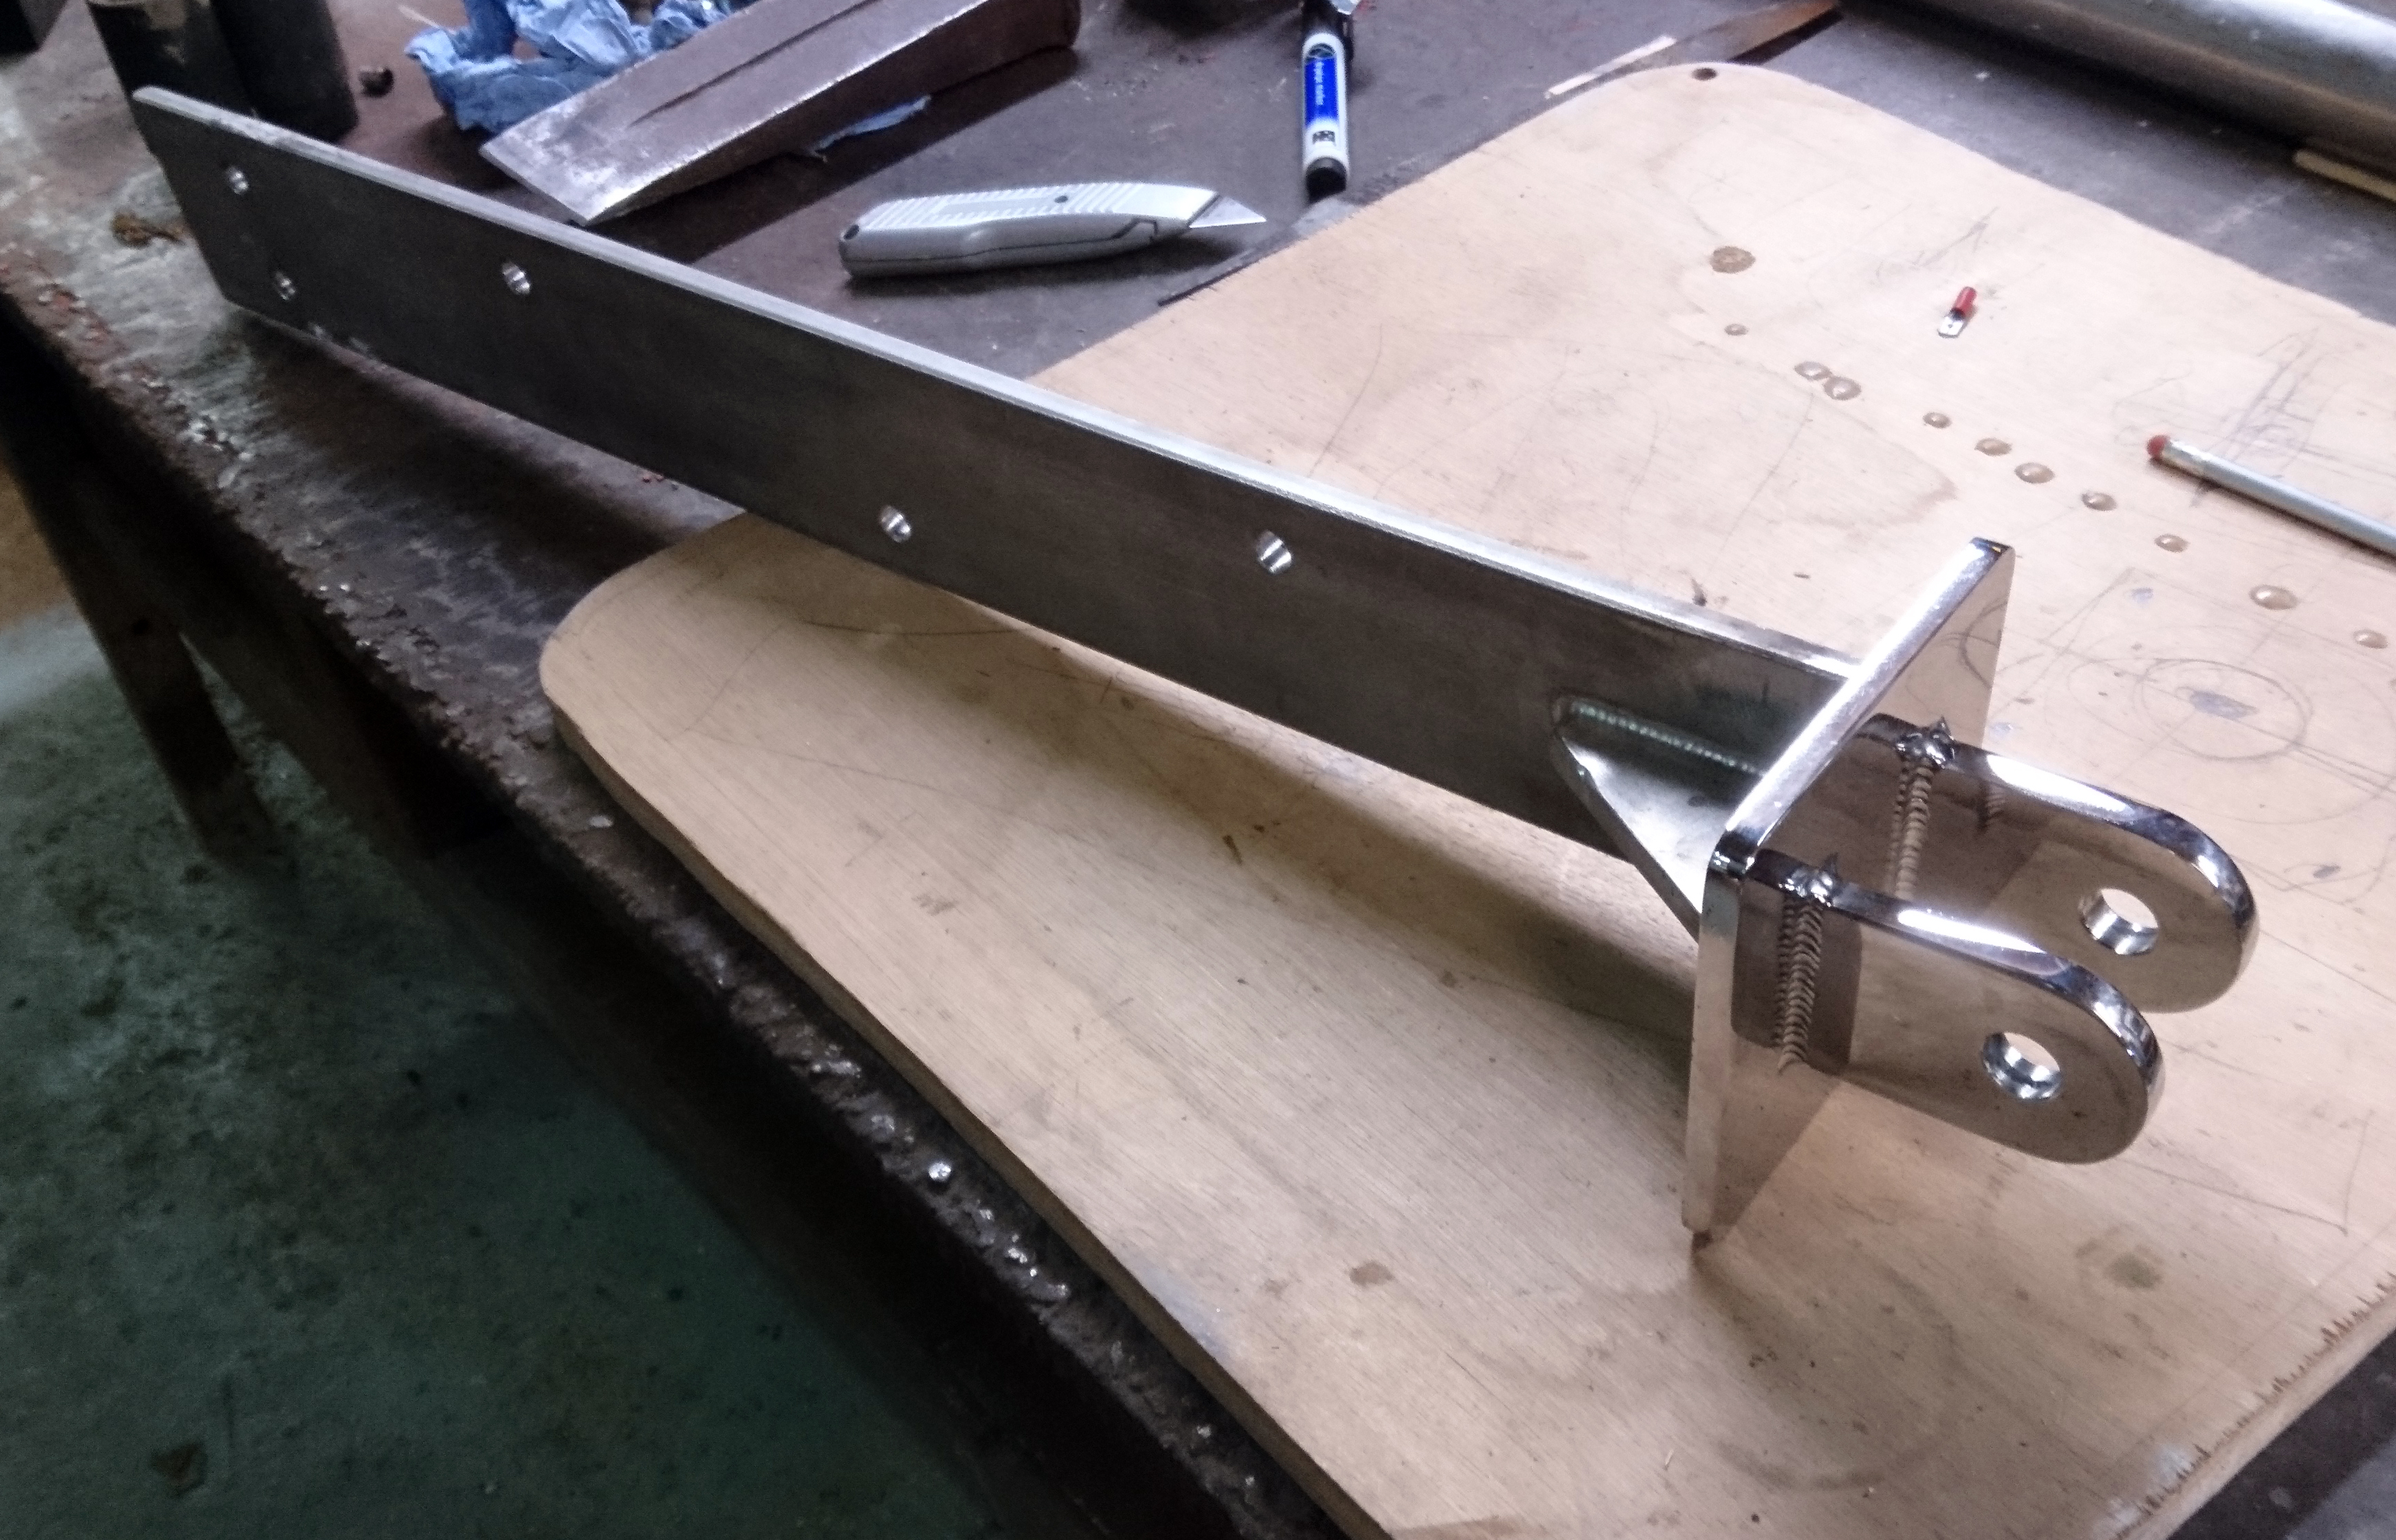
Passport 40 Chain Plate almost ready for fitting.
Needs another 3 x m12 mounting holes.
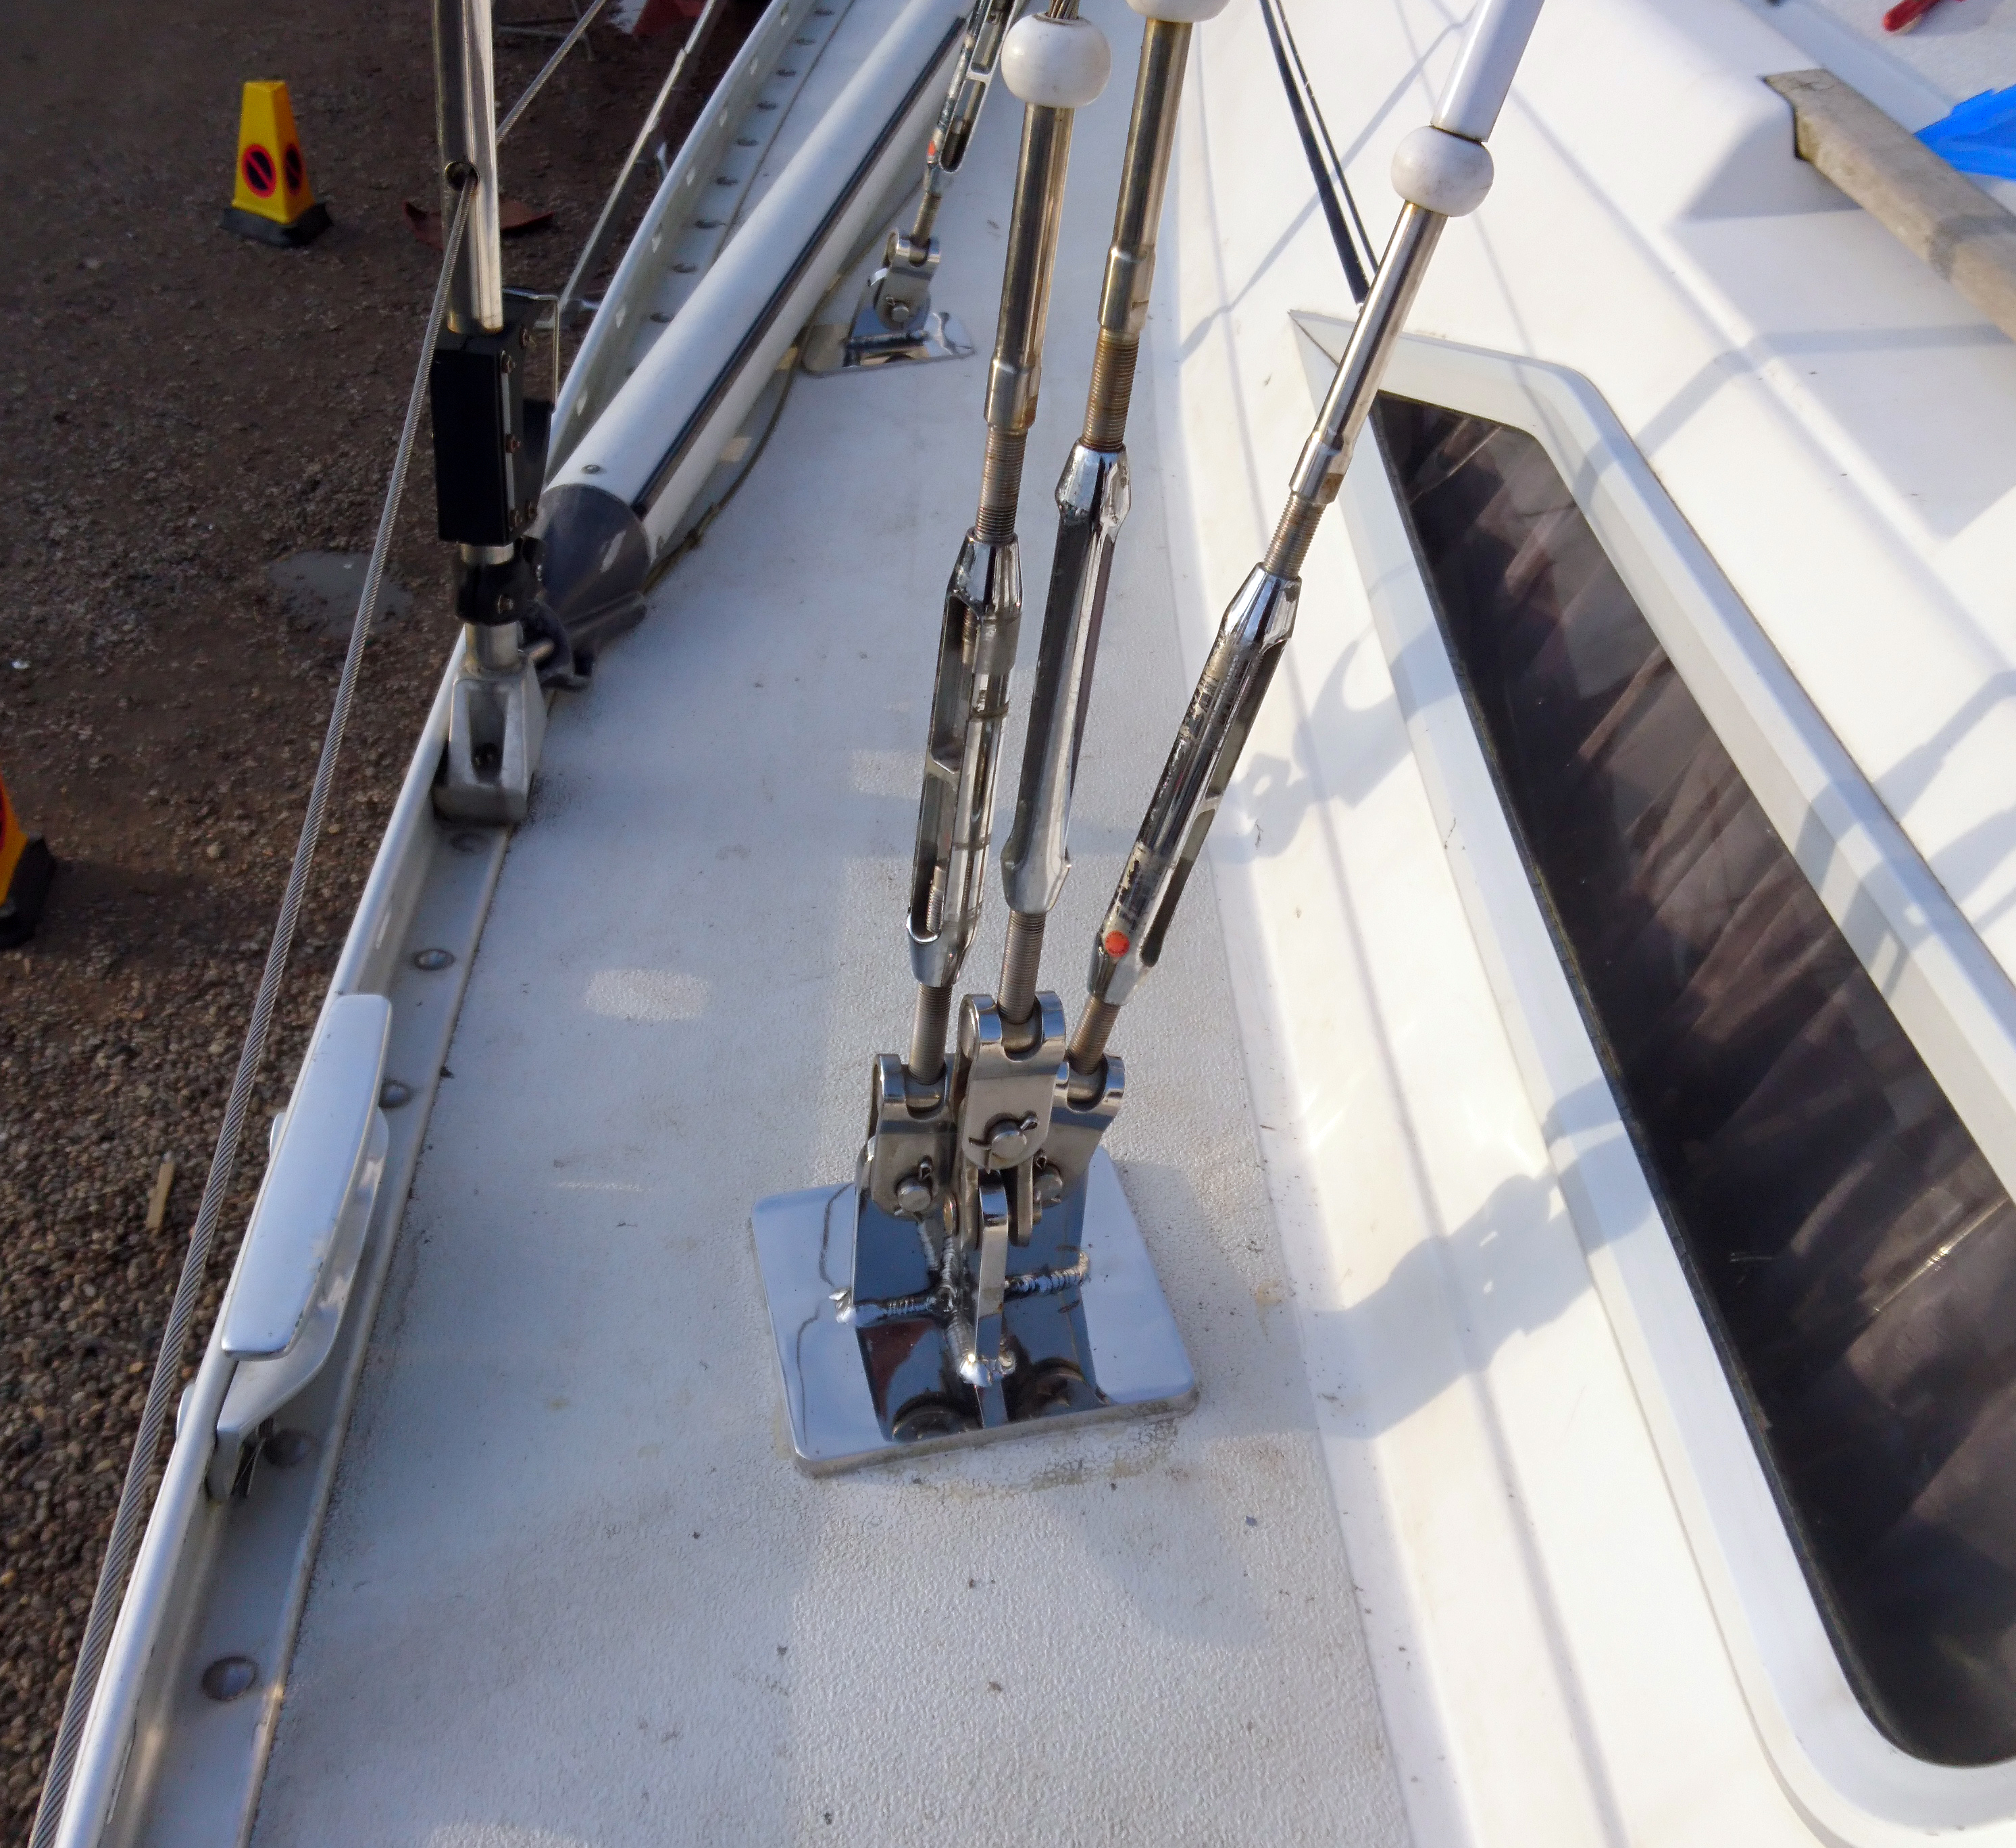
Finished chainplates on the Moody 35 with the rig back up and fully tensioned.
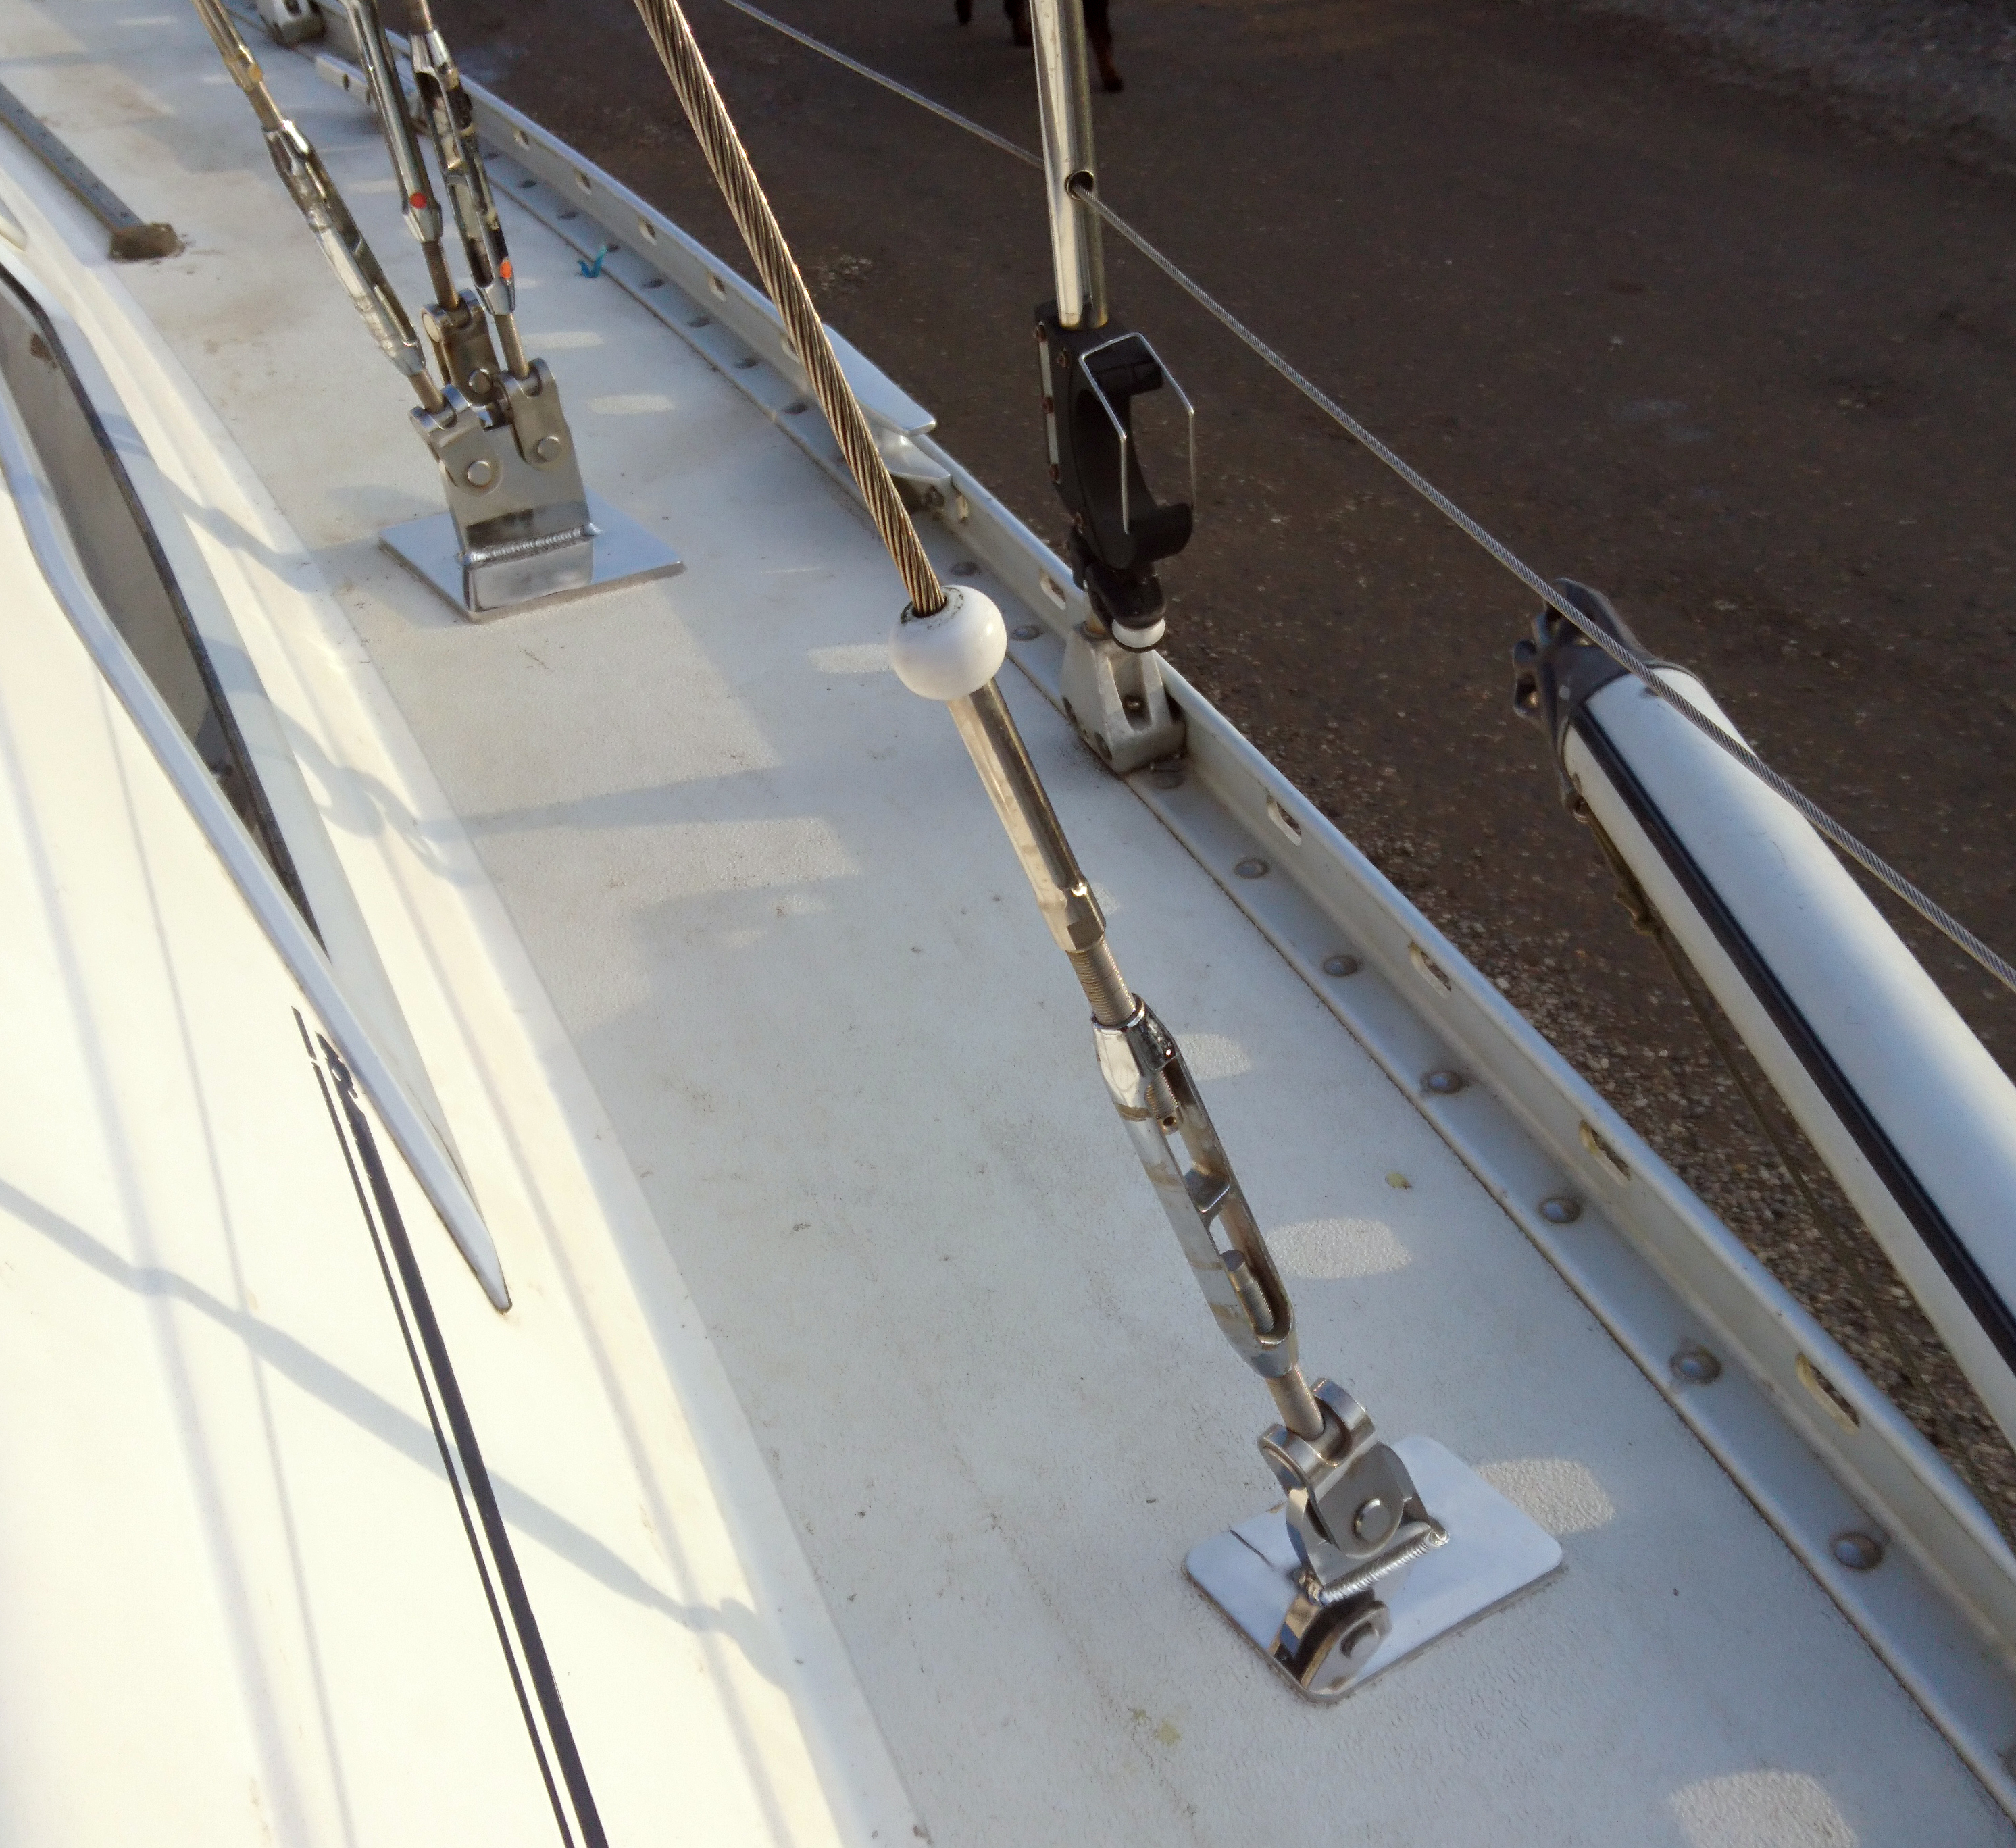
We over tensioned the rig initially to check everything was ok before re adjusting to the 15% settings on the wires for this rig.